- doc
- encryption and privacy
- Securely deleting files
Tails previously included tools to wipe files and available disk space. We removed these tools from Tails 6.0 (February 2024), because we think that they are not reliable enough on modern storage devices, such as USB sticks and Solid-State Drives (SSDs).
To better protect from data recovery, use encrypted volumes, overwrite the entire device, or disintegrate it physically.
Limitations of file deletion
See also Wikipedia: Data Erasure.
Deleting a file does not erase its content
Operating systems do not actually remove the content of a file when the file is deleted, even after emptying the trash or removing the file from the command line.
Instead, operating systems only mark the space that was used by the deleted file as available for future files, because it is much faster to do. However, the content of the deleted file remains on the device until the operating system reuses the space for another file.
Simple data recovery tools can recover deleted files.
Other copies of the data might be stored elsewhere
Other copies of the data might exist elsewhere on the device:
Some applications, for example, office applications, store temporary backup versions of the file to be able to recover from failures.
Modern operating systems can store a journal, a history of recent changes to the file system, or snapshots, an image of the file system at a particular point in time.
Simple data recovery tools can recover deleted files.
Spare memory cells can store a hidden copy of the data
Flash memory devices, such as USB sticks and SSDs (Solid-State Drives), have spare memory cells that are used to replace broken memory cells over time. Modern hard disks also integrate small flash memories for performance and reliability.
Any data that was stored in the device can remain available in these spare cells.
These spare cells are managed directly by the device and neither the user nor the operating system can control what is stored in them.
Specialized data recovery companies can recover data from spare cells.
Mitigation techniques
Given the limitations described above, there is no perfect solution to file deletion.
To better protect from data recovery, you can use one or a combination of these mitigation techniques, depending on the sensitivity of your data and the risks.
Use Tails to avoid saving files
All the files that you use in Tails disappear automatically when you shut down, except the files that you choose to store in the Persistent Storage or other storage devices.
By making it easy to avoid saving files to storage devices in the first place, using Tails is already an important mitigation technique given the limitations of file deletion.
Encrypt your storage devices
When all the data on your device is encrypted, data recovery tools can only recover encrypted data that is useless without your passphrase.
To better protect deleted files from data recovery, you can reformat your device and create another encryption with a different passphrase.
For compatibility with Tails only or with another Linux, use LUKS encrypted volumes.
For compatibility with Windows or macOS, use VeraCrypt encrypted volumes.
Take into account that you could be forced or tricked to give out your passphrase.
Overwrite the entire device
To better protect deleted files from data recovery, you can also reformat and overwrite the entire device with zeroes.
Even if some data could still be recovered from spare memory cells, overwriting the entire device is especially important if the device is not encrypted.
To do so:
Open the Disks utility.
All the current storage devices are listed in the left pane.
Plug in the device that you want to reformat and overwrite.
A new device appears in the list of devices. Click on it.
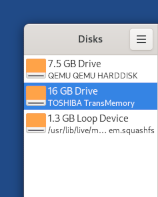
Check that the brand and size of the device in the right pane corresponds to your device.
Click on the
 button in the title bar and choose Format
Disk.
button in the title bar and choose Format
Disk.In the Format Disk dialog:
Choose Overwrite existing data with zeroes (Slow) in the Erase menu.
Overwriting existing data does not erase all data on flash memories, such as USB sticks and SSDs (Solid-State Drives).
See the limitations of file deletion.
Choose Compatible with all systems and devices (MBR/DOS) in the Partitioning menu.
Click Format.
In the confirmation dialog, make sure that the device is correct.
Click Format to confirm.
Physically destroy the device
As a last resort, physically destroying the device gives the strongest guarantee against data recovery.
It is unreliable to break the device into a few pieces or burn it with wood fire.
For top secret documents, the National Security Agency (NSA) of the USA recommends disintegration into particles of 2 mm. This can be achieved using a good quality household blender.