- doc
- encryption and privacy
- Crear y utilizar volúmenes LUKS cifrados
Introducción a LUKS
The simplest way to carry around the documents that you want to use with Tails encrypted is to use the Persistent Storage.
Puedes crear otros volúmenes cifrados usando LUKS para cifrar, por ejemplo, otra memoria USB o un disco duro externo. LUKS es el estándar para el cifrado en Linux.
The Disks utility allows you to create encrypted volumes.
El escritorio de GNOME te permite abrir volúmenes cifrados.
Comparación entre LUKS y VeraCrypt
You can also open VeraCrypt encrypted volumes in Tails. VeraCrypt is a disk encryption tool for Windows, macOS, and Linux. See our documentation about VeraCrypt.
We recommend that you use:
VeraCrypt to share encrypted files across different operating systems.
LUKS to encrypt files for Tails and Linux.
| LUKS | VeraCrypt | |
|---|---|---|
| Compatibility | Linux | Windows + macOS + Linux |
| Create new volumes | Yes | Outside of Tails |
| Open and modify existing volumes | Yes | Yes |
| Encrypted partitions (or entire disks) ¹ | Yes | Yes |
| Encrypted file containers ¹ | Complicated | Easy |
| Plausible deniability ² | No | Yes |
| Ease of use | Easier | More complicated |
| Speed | Faster | Slower |
Negación plausible: en alguno casos (por ejemplo, con los volúmenes ocultos de VeraCrypt ), es imposible que un adversario pruebe técnicamente la existencia de un volumen cifrado.
Still, deniable encryption might not protect you if you are forced to reveal the existence of the encrypted volume. See VeraCrypt: Plausible Deniability.
Crear una partición cifrada
Choose Applications ▸ Utilities ▸ Disks to open the Disks utility.
Identificar tu dispositivo de almacenamiento externo
The Disks utility lists all the current storage devices on the left side of the screen.
Introduce el dispositivo de almacenamiento externo que quieres usar.
A new device appears in the list of storage devices. Click on it.
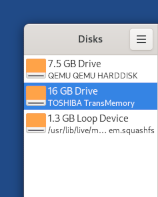
Check that the description of the device on the right side of the screen corresponds to your device: its brand, its size, etc.
Formatting the device
Click on the
 button in the title bar and choose
Format Disk to erase all the existing partitions on the device.
button in the title bar and choose
Format Disk to erase all the existing partitions on the device.In the Format Disk dialog:
If you want to overwrite all data on the device, choose Overwrite existing data with zeroes in the Erase menu.
Overwriting existing data does not erase all data on flash memories, such as USB sticks and SSDs (Solid-State Drives).
See the limitations of file deletion.
Choose Compatible with all systems and devices (MBR/DOS) in the Partitioning menu.
Click Format.
In the confirmation dialog, make sure that the device is correct.
Click Format.
Crear una nueva partición cifrada
Now the schema of the partitions in the middle of the screen shows an empty device:
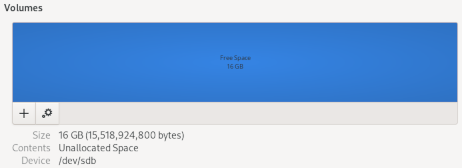
Click on the
 button to create a new
partition on the device.
button to create a new
partition on the device.Configure the various settings of your new partition in the partition creation assistant:
En la pantalla Crear partición:
Partition Size: you can create a partition on the whole device or only on part of it.
In the example below, we are creating a partition of 4.0 GB on a device of 8.1 GB.
In the Format Volume dialog:
Volume Name
You can give a name to the partition. This name remains invisible until the partition is open but can help you to identify it during use.
Erase
You can choose to overwrite existing data on the partition.
Overwriting existing data does not erase all data on flash memories, such as USB sticks and SSDs (Solid-State Drives).
See the limitations of file deletion.
Type
Choose Internal disk for use with Linux systems only (Ext4) and Password protect volume (LUKS).
En la pantalla de Configurar contraseña:
Password: type a passphrase for the encrypted partition and repeat it to confirm.
We recommend choosing a long passphrase made of 5 to 7 random words. Learn about the maths behind memorizable and secure passphrases.
It is impossible to recover your passphrase if you forget it!
To help you remember your passphrase, you can write it on a piece of paper, store it in your wallet for a few days, and destroy it once you know it well.
Haz click en Crear.
Creating the partition takes from a few seconds to a few minutes. After that, the new encrypted partition appears in the volumes on the device:
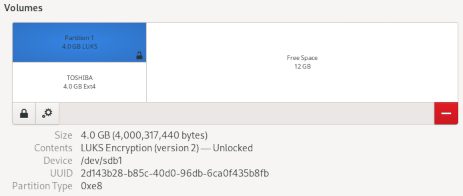
If you want to create another partition in the free space on the device, click on the free space and then click on the
button again.
Using the new partition
Puedes abrir esta nueva partición desde la barra lateral del explorador de archivos con el nombre que le diste.
After opening the partition with the file browser, you can also access it from the menu.
Opening an existing encrypted partition
When you plug in a device that has an encrypted partition, Tails offers to unlock the encryption automatically.
Plug in the external storage device that has the encrypted partition.
A dialog appears, asking for the passphrase to unlock the partition.
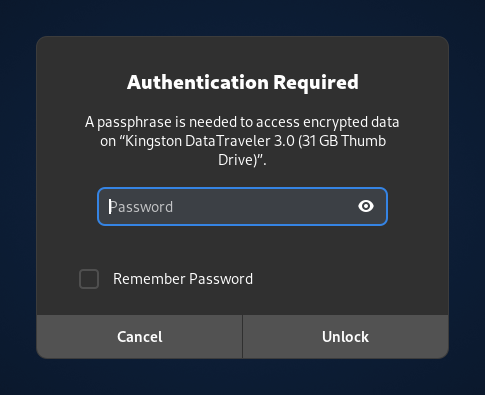
Enter the passphrase of the partition in the password prompt and click Unlock.
If you turn on the option Remember Password, Tails remembers the passphrase of this partition only until you shut down. The passphrase is not stored in your Persistent Storage.
After unlocking, you can access the content of the partition from either:
- The Places menu
- The sidebar of the Files browser
After you finished using the partition, click on the ![]() button next to the partition in the
sidebar of the Files browser to eject the partition safety and lock again the
encryption.
button next to the partition in the
sidebar of the Files browser to eject the partition safety and lock again the
encryption.
Storing sensitive documents
Such encrypted volumes are not hidden. An attacker in possession of the device can know that there is an encrypted volume on it. Take into consideration that you can be forced or tricked to give out its passphrase.
Opening encrypted volumes from other operating systems
Es posible abrir estos volúmenes cifrados desde otros sistemas operativos, pero hacerlo podría comprometer la seguridad que da Tails.
Por ejemplo, las imágenes en miniatura podrían ser creadas y guardadas por otro sistema operativo. O, los contenidos de los archivos podrían ser indexados por el otro sistema operativo.
Changing the passphrase of an existing encrypted partition
Choose Applications ▸ Utilities ▸ Disks to open the Disks utility.
Plug in the external storage device that contains the encrypted partition for which you want to change the passphrase.
The device appears in the list of storage devices. Click on it.
Check that the description of the device on the right side of the screen corresponds to your device: its brand, its size, etc.
Click on the partition displaying a
 in the bottom-right corner.
Click on the
 button and choose Change Passphrase in
the shortcut menu.
button and choose Change Passphrase in
the shortcut menu.