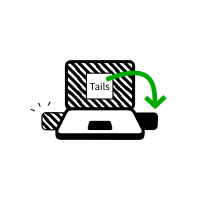
- upgrade
- Atualize manualmente a partir de um macOS
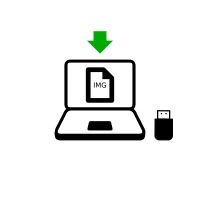
Você precisa de
1 pendrive USB
Exclusivo para o Tails!
8 GB no mínimo
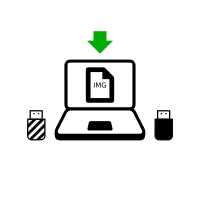
Seu Tails
1 pendrive USB
Todos os dados serão apagados!
8 GB no mínimo
Windows 7
ou mais recente
macOS 10.10
Yosemite
ou mais recente
Linux
qualquer distribuição
Debian
Ubuntu
ou uma distribuição derivada
Another Tails
Pendrive USB ou DVD
Processador Intel
Exceto Apple M1 e M2
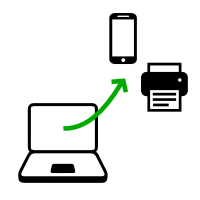
Smartphone
or printer
para acompanhar as instruções
1 hora no total
½ hora
¼ de hora
1.5 GB para baixar
½ hora para instalar
½ hora para atualizar
Requisitos de sistema detalhados e hardware recomendado.
Resumo
Tails funciona:
- Na maioria dos computadores PC com menos de 10 anos de idade
- Em alguns computadores Mac antigos que possuem processador Intel
Tails não funciona em:
- Computadores MAc mais novos com processador Apple (M1 ou M2)
- Smartphones ou tablets
- Raspberry Pi
Tails pode não funcionar em:
Alguns computadores mais antigos, por exemplo aqueles que não têm 2 GB de RAM.
Alguns computadores mais novos se, por exemplo, sua placa de vídeo for incompatível com Linux. Placas Nvidia e AMD Radeon em geral não funcionam no Tails.
Veja nossa lista de problemas conhecidos de compatibilidade de hardware.
Requisitos detalhados de hardware
Um pendrive USB de no mínimo 8 GB ou um DVD gravável.
Todos os dados no pendrive USB ou no DVD são perdidos ao instalar Tails.
A possibilidade de iniciar a partir de um pendrive USB ou de um leitor de DVD.
Um processador x86-64 IBM PC compatível de 64-bits.
Tails não funciona em Arquitetura ARM nem em processadores PowerPC.
Tails não funciona com computadores 32-bits desde o Tails 3.0 (junho de 2017).
2 GB de memória RAM para funcionar sem problemas.
Tails pode funcionar com menos de 2 GB de memória RAM, mas pode se comportar de maneira estranha ou travar.
Hardware recomendado
Os modelos de laptop evoluem rápido demais para que possamos manter uma lista atualizada de hardware recomendado. Abaixo estão algumas orientações caso você ou sua organização estejam condierando adquirir um laptop dedicado a rodar o Tails.
Para PC
Evite modelos "gamer" com placas de vídeo Nvidia ou AMD Radeon.
Considere a possibilidade de comprar um laptop recondicionado de alguma série (profissional) topo de linha. Eles são baratos e vão durar mais do que se você comprar laptopos novos mas de baixa qualidade.
Por exemplo, a série Lenovo ThinkPad funciona bem com Tails, incluindo os modelos X250, X1 Carbon, T440, T480 e T490.
Se você vive em uma pate do mundo onde comprar laptops recondicionados não é comum, dê uma olhada no eBay e Amazon. A Amazon oferece a Garantia Renovada Amazon de 90 dias.
Considere a possibilidade de comprar um laptop novo de fornecedores que garantam a compatibilidade com Linux e Tails, tais como ThinkPenguin.
Para Mac
Infelizmente, nós não sabemos de nenhum modelo de Mac que funciona bem com Tails e consegue rodar a versão mais recente do macOS.
Seus passos
Baixe o Tails
Baixe o Tails
Baixe a atualização

Verifique seu download

Verifique seu download

Verifique seu download

Reinicie no outro Tails

Baixe balenaEtcher
Instale balenaEtcher
Baixe balenaEtcher
Instale balenaEtcher
Instale Tails usando balenaEtcher
Instale Tails usando GNOME Disks
Install Tails using dd
Instale o intermediário usando balenaEtcher
Instale o intermediário usando GNOME Disks
Instale o intermediário usando GNOME Disks

Reinicie no seu pendrive USB com Tails
Reinicie no intermediário
Reinicie no intermediário
Instale Tails clonando
Atualize seu Tails clonando
Reinicie no seu novo Tails

Boas-vindas ao Tails!
Baixe o Tails
or download using BitTorrent BitTorrent
Save your download to your usual Downloads folder and not to the USB stick.
We recommend that you save your download to your Persistent Storage. Otherwise, Tails might stop responding if the RAM memory of the computer gets full.
Enquanto o arquivo baixa, recomendamos que você leia as notas de lançamento do Tails 6.6 . Elas detalham todas as mudanças nesta nova versão: novas funcionalidades, problemas que foram solucionados, e problemas conhecidos que já foram identificados.
Verifique seu download
Verifique o arquivo baixado para ter certeza de que é seguro e não foi corrompido durante o download.
Seu cliente BitTorrent verificará automaticamente seu download quando ele terminar.
A verificação abaixo é opcional para um download feito via BitTorrent.
Você parece ter JavaScript desativado. Para verificar seu download, você pode:
Habilitar JavaScript e recarregar esta página.
Compare manually the checksum of your download with the checksum of our images. In Tails, you can install GtkHash as Additional Software
Verify your download using our OpenPGP signing key and OpenPGP signature. OpenPGP signature.
Nós não fornecemos mais instruções para verificação de downloads usando OpenPGP.
Veja nossa análise de segurança das diferentes técnicas de verificação.
Você parece estar usando Internet Explorer. Para verificar seu download, use um navegador diferente.
ou verifique usando a assinatura OpenPGP
OpenPGP signature OpenPGP signature
Se você não sabe como usar a assinatura OpenPGP, clique no botão Selecione seu download… para verificar seu download usando JavaScript.
Verificando $FILENAME…
![]() Verificação bem
sucedida! ($FILENAME)
Verificação bem
sucedida! ($FILENAME)
![]() Falha na
verificação! ($FILENAME)
Falha na
verificação! ($FILENAME)
O mais provável é que a verificação tenha falhado por causa de um erro ou de uma interrupção durante o download.
A verificação também falha quando se tenta verificar um download de uma versão do Tails que não seja a mais recente: 6.6 .
Com menor probabilidade, a verificação pode ter falhado por causa de um arquivo malicioso baixado de um de nossos espelhos, ou por causa de um ataque na rede do seu país ou na sua rede local.
Fazer uma nova tentativa de baixar geralmente é o suficiente para consertar esse problema. Caso não funcione, por favor tente baixar em um lugar diferente ou em um computador diferente.
![]() Erro ao selecionar a
imagem.
Erro ao selecionar a
imagem.
Verifique se a imagem USB que você escolheu pode ser lida pelo seu navegador.
Tenha certeza de ter escolhido uma imagem ISO que possa ser lida pelo seu navegador.
![]() Erro ao tentar baixar
um arquivo de checksums do nosso
site.
Erro ao tentar baixar
um arquivo de checksums do nosso
site.
Verifique se seu navegador está conectado à Internet.
![]() Erro ao ler imagem
$FILENAME.
Erro ao ler imagem
$FILENAME.
Tenha certeza de que $FILENAME pode ser lido pelo seu navegador.
Instalar balenaEtcher
Nessas próximas etapas você irá instalar um Tails intermediário usando a imagem Tails USB que você baixou anteriormente.
balenaEtcher is the Free Software tool that we recommend to install Tails on USB sticks.
Instead of using balenaEtcher, you can
also install Tails using dd on the command
line.
Certifique-se de que o seu pendrive USB esteja desconectado.
Open the Terminal utility from Applications ▸ Utilities.
Execute the following command.
diskutil list
Ele retorna uma lista dos dispositivos de armazenamento no sistema. Por exemplo:
/dev/disk0
 #:                     TYPE NAME         SIZE      IDENTIFIER
 0:    GUID_partition_scheme             *500.1 GB  disk0
 1:                      EFI              209.7 MB  disk0s1
 2:                Apple_HFS MacDrive     250.0 GB  disk0s2
 3:                      EFI              134.1 GB  disk0s3
 4:     Microsoft Basic Data BOOTCAMP     115.5 GB  disk0s4
Conecte o seu pendrive USB ao computador.
Execute again the same command.
diskutil list
O seu pendrive USB aparece como um novo dispositivo na lista. Confirme se o tamanho que aparece corresponde ao tamanho do seu pendrive USB.
/dev/disk0
 #:                     TYPE NAME         SIZE      IDENTIFIER
 0:    GUID_partition_scheme             *500.1 GB  disk0
 1:                      EFI              209.7 MB  disk0s1
 2:                Apple_HFS MacDrive     250.0 GB  disk0s2
 3:                      EFI              134.1 GB  disk0s3
 4:     Microsoft Basic Data BOOTCAMP     115.5 GB  disk0s4

/dev/disk1
 #:                     TYPE NAME         SIZE      IDENTIFIER
 0:   FDisk_partition_scheme             *8.0 GB    disk1
 1:                Apple_HFS Untitled 1   8.0 GB    disk1s1
Take note of the device name of your USB stick.
In this example, the USB stick is 8.0 GB and its device name is /dev/disk1. Yours might be different.
Se você não tiver certeza sobre o nome do seu dispositivo, você deverá parar o procedimento ou estará correndo o risco de sobrescrever algum disco rígido do sistema.
Execute the following command to safely eject the USB stick. Replace device with the device name found in step 6.
diskutil unmountDisk device
Execute os seguintes comandos para copiar a imagem USB que você baixou anteriormente para o pendrive USB.
Substitua:
tails.img com o caminho para a imagem USB
Se você não tiver certeza sobre o caminho para a imagem USB, você pode inserir o caminho correto arrastando o ícone da imagem USB do Finder até o Terminal.
device com o nome do dispositivo encontrado na etapa 6
Você pode tentar adicionar
rantes dediskpara fazer a instalação ser mais rápida.
dd if=tails.img of=device bs=16m && sync
Você deve ver algo como:
dd if=/Users/me/tails-amd64-3.12.img of=/dev/rdisk9 bs=16m && sync
Se nenhuma mensagem de erro aparecer, Tails estará sendo copiado para o pendrive USB. A cópia demora algum tempo, geralmente alguns minutos.
If you get a
Permission deniederror, try addingsudoat the beginning of the command:sudo dd if=tails.img of=device bs=16m && sync
If you get an
invalid number ‘16m’error, try using16Minstead:dd if=tails.img of=device bs=16M && sync
The installation is complete when the command prompt reappears.
Clique no botão abaixo para baixar balenaEtcher:
Save your download to your usual Downloads folder and not to the USB stick.
Abra o balenaEtcher baixado (no formato DMG disk image).
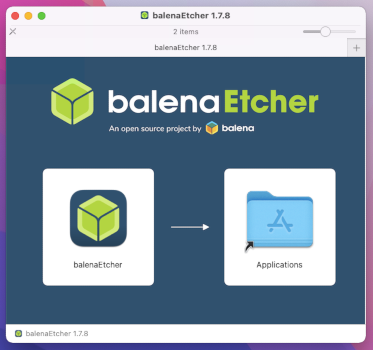
Para instalar balenaEtcher, arraste o ícone do balenaEtcher até o ícone de Aplicativos.
Feche a janela de instalação do balenaEtcher.
Optionally, eject the disk image of balenaEtcher from the sidebar of Finder.
Instale um Tails intermediário usando balenaEtcher
Abra o Finder e escolha balenaEtcher nos Aplicativos.
Abra o download do balenaEtcher.
No aviso de segurança, confirme que você quer abrir o balenaEtcher.
balenaEtcher iniciará.
Caso o balenaEtcher não inicie, reinicie o Windows e tente novamente.

Insira o pendrive USB no qual você deseja instalar Tails. o Tails intermediário.
O Armazenamento Persistente do seu pendrive USB com Tails não será copiado para o Tails temporário.
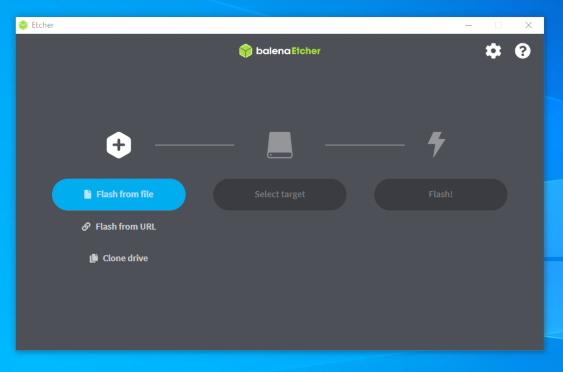
Clique no botão Flash from file (gravar à partir de arquivo, em inglês).
Escolha a imagem USB que você baixou anteriormente.
Make sure that the USB image is called tails-amd64-6.6.img and has an .img file extension.
If the image has an .iso file extension, it is the wrong image. Please go back to the download step. download step. download step. download step.
Clique no botão Select target (escolher alvo, em inglês) para escolher o seu pendrive USB.
Todos os dados nesse pendrive USB serão perdidos.
Clique em Flash.
Insira sua senha caso seja solicitado.
A instalação demora alguns minutos.
Após instalar Tails, o balenaEtcher verificará a instalação.
Se a verificação do balenaEtcher falhar, tente instalar novamente, ou tente usar outro pendrive USB.
Feche o balenaEtcher.
Caso apareça uma notificação sobre o pendrive USB não ser legível, clique em Ejetar para ejetar o pendrive USB.
Muito bem!
Você acaba de instalar Tails no seu pendrive USB.
No próximo passo você fará com que seu computador inicie a partir desse pendrive USB.
Pode ser que o Tails não funcione no seu computador, então boa sorte!
Se você já estiver no outro Tails, vá diretamente para a etapa 3: Verifique que o outro Tails está atualizado.
Abra estas instruções em outro dispositivo
No próximo passo, você irá desligar o computador. Para que você possa em seguida acompanhar o resto das instruções, você pode fazer um dos seguintes:
Escanear este QR code usando seu celular ou tablet:


Imprimir essas instruções em papel.
Anotar a URL dessa página:
https://tails.net/install/windows?back=1
https://tails.net/install/mac?back=1
https://tails.net/install/linux?back=1
https://tails.net/install/expert?back=1
https://tails.net/install/clone/pc?back=1
https://tails.net/install/clone/mac?back=1
https://tails.net/upgrade/tails?back=1
https://tails.net/upgrade/windows?back=1
https://tails.net/upgrade/mac?back=1
https://tails.net/upgrade/linux?back=1
https://tails.net/upgrade/clone?back=1
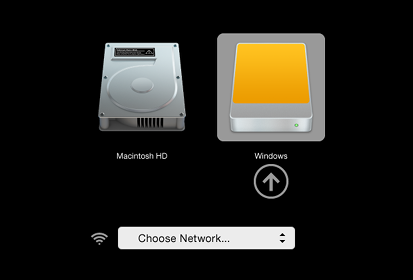
Reinicie no Tails intermediário
Reinicie no outro Tails
Reinicie no seu pendrive USB Tails

Faça o computador iniciar no pendrive USB
-
Certifique-se de ter instalado Tails usando uma das seguintes formas:
Clique no botão Iniciar
 .
.Pressione e segure a tecla Shift enquanto você escolhe o botãoLigar/Desligar ▸ Reiniciar.
Na tela que diz Escolha uma opção, escolha Usar um dispositivo.
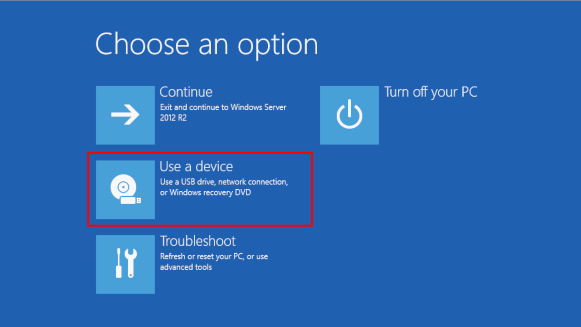
Se a tela que diz Escolha uma opção se a opção Use um dispositivo não aparecerem, consulte as instruções para iniciar o Tails usando a tecla do Menu de Boot.
Na tela de Usar um dispositivo, escolha Menu de Boot.
O Windows será desligado, o computador será reiniciado e então o Menu de Boot aparecerá.
Conecte seu pendrive USB com Tails logo após escolher Menu de Boot, enquanto o Windows ainda estiver sendo desligado.
If your Windows has no Boot Menu option available, make sure that your intermediary Tails USB stick is plugged in and choose your USB stick directly in the list of devices.
Daqui em diante, nós Nós recomendamos que você apenas conecte seu pendrive USB com Tails durante o desligamento do Windows. Caso contrário, um vírus no Windows poderia infectar seu pendrive USB com Tails e minar sua segurança.
Tal ataque é possível em teoria mas muito improvável na prática. Nós não temos notícia de nenhum vírus capaz de infectar o Tails. Veja o nosso aviso sobre plugar Tails em sistemas não confiáveis.
A lista do Menu de Boot é uma lisa de possíveis dispositivos de inicialização. A captura de tela a seguir mostra um exemplo de um Menu de Boot:
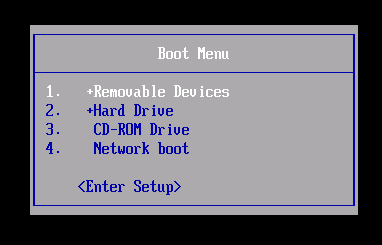
No Menu de Boot, selecione o seu pendrive USB e pressione Enter.
Se o computador iniciar no Tails, o Boot Loader aparecerá e o Tails iniciará automaticamente após 4 segundos.
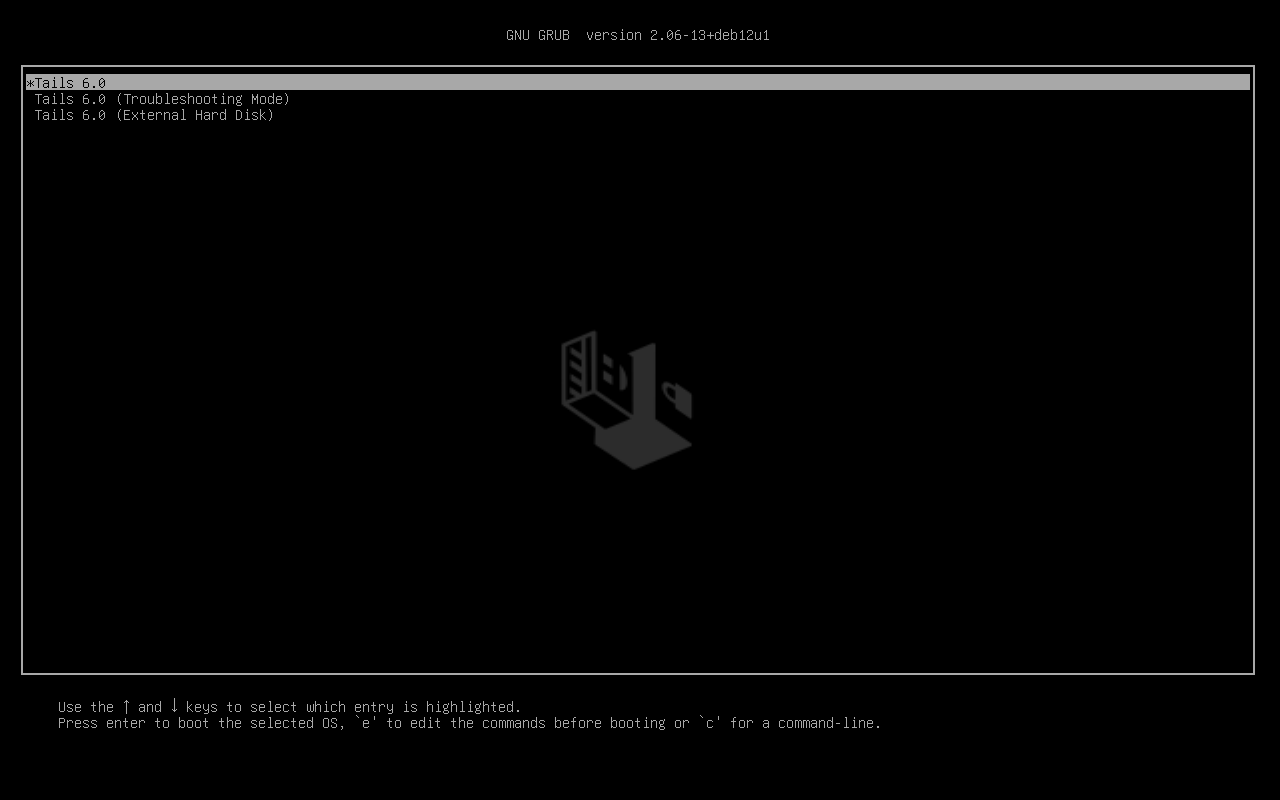
A opção Troubleshooting Mode desabilita algumas funcionalidades do kernel Linux e pode funcionar melhor em alguns computadores. Você pode tentar esta opção caso creia que está tendo problemas de compatibilidade ao iniciar o Tails.
A opção External Hard Disk torna possível iniciar a partir de um disco externo e de alguns pendrives USB problemáticos.
Most computers do not start automatically on the Tails USB stick, but you can press a Boot Menu key to display a list of possible devices to start from.
Se o Windows 8 ou 10 também estiver instalado no computador, siga nossasinstruções para iniciar o Tails a partrir do Windows 8 ou 10. Iniciar o Tails a partir do Windows é mais fácil do que iniciar usando a tecla do Menu de Boot.
A captura de tela a seguir é um exemplo de um Menu de Boot:
Essa animação mostra como usar a tecla do Menu de Boot para iniciar no pendrive USB:
As instruções a seguir explicam detalhadamente como usar a tecla do Menu de Boot para iniciar no pendrive USB:
-
Certifique-se de ter instalado Tails usando uma das seguintes formas:
-
Deixe o pen drive USB conectado e desligue o computador.
Desligue o computador e conecte o pendrive USB com Tails.
Desligue o computador.
Conecte o outro pendrive USB com Tails a partir do qual você quer instalar clonar.
Desconecte o seu pendrive USB com Tails e mantenha o pendrive USB intermediário conectado.
-
Identifique as possíveis teclas do Menu de Boot de acordo com o fabricante do computador na lista seguinte:
Fabricante Tecla Acer F12, F9, F2, Esc Apple Opção Asus Esc Clevo F7 Dell F12 Fujitsu F12, Esc HP F9 Huawei F12 Intel F10 Lenovo F12, Novo MSI F11 Samsung Esc, F12, F2 Sony F11, Esc, F10 Toshiba F12 Outros… F12, Esc Em diversos computadores, uma mensagem que aparece muito rapidamente ao ligar pode explicar como ativar o Menu de Boot ou acessar as configurações da BIOS.
-
Ligue o computador.
Pressione imediatamente e várias vezes a primeira tecla do Menu de Boot identificada no passo 2.
-
Se o computador iniciar em outro sistema operacional ou retornar uma mensagem de erro, desligue o computador novamente e repita a etapa 3 para todas as possíveis teclas de Menu de Boot identificadas na etapa 2.
Se um menu de Boot com uma lista de dispositivos aparecer, selecione o seu pendrive USB e pressione Enter.
Se o computador iniciar no Tails, o Boot Loader aparecerá e o Tails iniciará automaticamente após 4 segundos.
-
Certifique-se de ter instalado Tails usando uma das seguintes formas:
-
Desligue o computador.
Deixe o pen drive USB conectado e desligue o computador.
Plugue o pen drive USB com Tails a partir do qual você quer fazer a instalação.
-
Conecte o seu pendrive USB Tails.
-
Ligue o computador.
Immediately press-and-hold the Option key (⌥ or Alt key) when the startup sound is played.
Segure o botão até que a lista de possíveis discos de inicialização apareçam.
-
Selecione o pendrive USB e pressione Enter. O pendrive USB aparecerá como um disco rígido externo e pode estar rotulado EFI Boot ou Windows como na seguinte captura de tela:
Se o pendrive USB não aparecer na lista de discos de inicialização:
Wait 2–3 minutes and try again. Some USB sticks need some rest after installing.
Try all other USB ports on the computer. Some USB ports cannot be used to start from.
Certifique-se de ter instalado Tails usando uma das seguintes formas:
Make sure that you have verified your download of Tails.
Make sure that you have verified your download.
-
Try to install again on the same USB stick.
Try to install again on the same USB stick.
Try to install again on the same USB stick.
Try to install again on the same USB stick.
Try to install again on the same USB stick.
Try to install again on the same USB stick.
Try to install again on the same USB stick.
Try to install again on the same USB stick.
Try to install again on the same USB stick.
Try to install again on the same USB stick.
Try to install again on the same USB stick.
Try to install again on the same USB stick.
Try to install on a different USB stick.
Try to use the same USB stick to start on a different computer.
Se o computador ainda assim não mostrar o Boot Loader, pode ser que não seja possível iniciar o Tails no seu computador no momento.
-
Se o seu Mac mostrar o seguinte erro:
Configurações de segurança não permitem esse Mac usar outro disco externo de inicialização.
Então você terá que mudar as configurações em Utilitário de segurança de inicialização do seu Mac para autorizar a inicialização à partir do Tails.
Para abrir o Utilitário de segurança de inicialização:
Ligue o seu Mac, então aperte e segure Command(⌘)+R imediatamente após você ver a logomarca da Apple. Seu Mac iniciará à partir da Recuperação do macOS.
Quando você ver a janela de utilitários do macOS, escolha Utilitários ▸ Utilitário de segurança de inicialização à partir da barra de menu.
Quando você tiver que se autenticar, clique em Inserir senha macOS, e então escolha uma conta de administrador e insira sua senha.
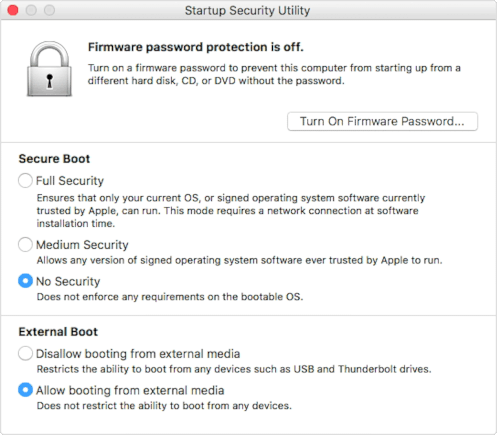
No Utilitário de segurança de inicialização:
Escolha Nenhuma segurança na opção Boot Seguro.
Escolha Permitir inicialização a partir de mídia externa no Boot Externo.
Para manter a proteção do seu Mac contra inicialização a partir de mídias externas não confiáveis você pode definir uma senha de firmware, disponível no macOS Mountain Lion e versões mais recentes. Uma senha de firmware impede usuários que não possuem a senha de inicializar a partir de qualquer mídia que não seja a mídia de inicialização configurada.
Se você esquecer a senha de firmware, será necessário um agendamento de serviço presencial em uma loja da Apple ou com uma assistência autorizada pela Apple.
A assistência da Apple possui mais informações sobre:
Se o computador iniciar no Tails, o Boot Loader aparecerá e o Tails iniciará automaticamente após 4 segundos.
A opção Troubleshooting Mode desabilita algumas funcionalidades do kernel Linux e pode funcionar melhor em alguns computadores. Você pode tentar esta opção caso creia que está tendo problemas de compatibilidade ao iniciar o Tails.
A opção External Hard Disk torna possível iniciar a partir de um disco externo e de alguns pendrives USB problemáticos.
Troubleshoot Tails not starting
-
Se nenhum menu de boot aparecer, consulte as Instruções sobre como iniciar o Tails usando a tecla do Menu de Boot.
-
Se nenhuma das possíveis teclas de Menu de Boot da técnica anterior funcionou, consulte as instruções de resolução de problemas para quando o Tails não inicia de jeito nenhum.
-
If the Boot Menu appears but your USB stick is not listed in the Boot Menu:
Wait 2–3 minutes and try again. Some USB sticks need some rest after installing.
Try all other USB ports on the computer. Some USB ports cannot be used to start from.
-
Se o seu pendrive USB está listado no menu de Boot, mas o Boot Loader não aparece:
Se o seu pendrive USB aparece na lista de discos de inicialização, mas o Boot Loader não aparece:
Wait 2–3 minutes and try again. Some USB sticks need some rest after installing.
Try all other USB ports on the computer. Some USB ports cannot be used to start from.
Certifique-se de ter instalado Tails usando uma das seguintes formas:
Make sure that you have verified your download of Tails.
Make sure that you have verified your download.
-
Try to install again on the same USB stick.
Try to install again on the same USB stick.
Try to install again on the same USB stick.
Try to install again on the same USB stick.
Try to install again on the same USB stick.
Try to install again on the same USB stick.
Try to install again on the same USB stick.
Try to install again on the same USB stick.
Try to install again on the same USB stick.
Try to install again on the same USB stick.
Try to install again on the same USB stick.
Try to install again on the same USB stick.
Try to install on a different USB stick.
Try to use the same USB stick to start on a different computer.
Se o seu computador continua sem mostrar o Boot Loader, pode ser que atualmente não seja possível iniciar o Tails no seu computador.
-
Se o Boor Loader aparece mas o Tails não consegue iniciar após o boot loader, veja a seção de resolução de problemas para quando o Tails não iniciar após o Boot Loader. seção de resolução de problemas para quando o Tails não iniciar após o Boot Loader.
Iniciar o computador usando uma tecla de Menu de Boot pode ser mais rápido do que iniciar o computador no Windows primeiro e depois no Tails. Nós recomendamos que você aprenda como iniciar o Tails usando a tecla de menu de boot caso você use Tails com frequência.
Apple não prioriza em colaborar com projetos de Software Livre. Seus novos hardwares geralmente são bem difíceis para desenvolvedores de software livre conseguirem fazer Linux e, consequentemente, Tails funcionarem. Hardware de PCs geralmente são mais abertos e funcionam melhor com Linux.
Boas-vindas ao Tails!
Starting the intermediary Tails
Após o Menu de Boot, uma tela de carregamento aparecerá.

Um ou dois minutos depois do Boot Loader e da tela de carregamento, a Tela de Boas-vindas aparecerá.
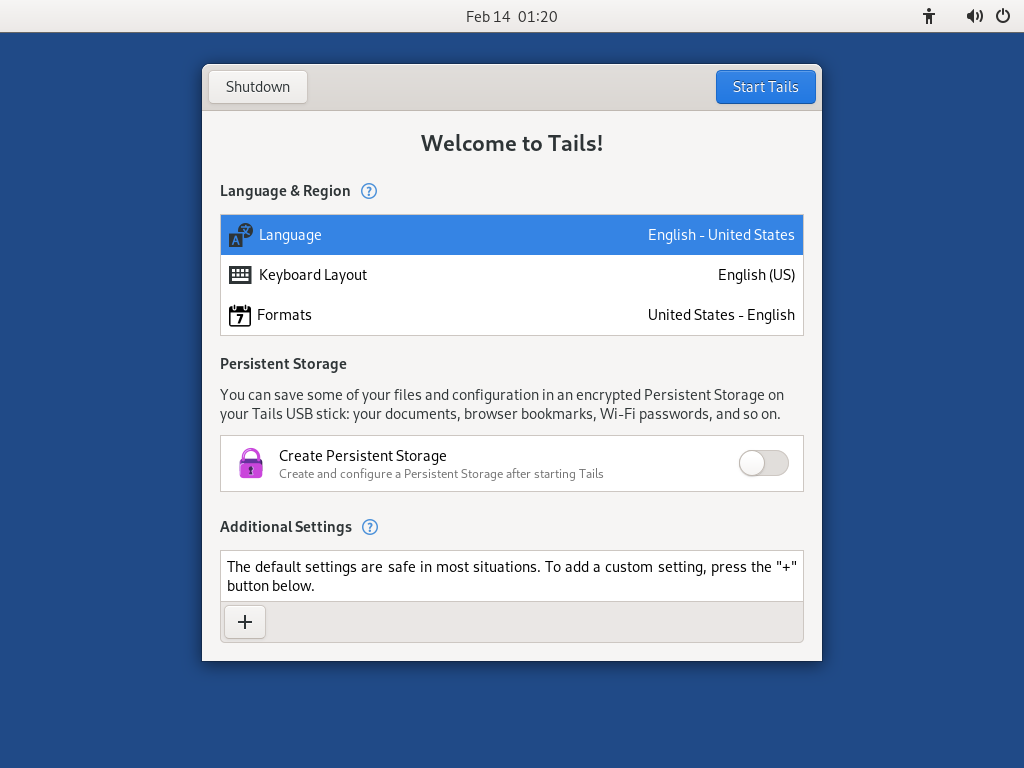
In the Welcome Screen, select your language and keyboard layout in the Language and Formats section. Click Start Tails.
Se o seu teclado ou touchpad não funcionarem, tente usar um teclado ou um mouse USB.
Após 15–30 segundos, a área de trabalho do Tails aparecerá.
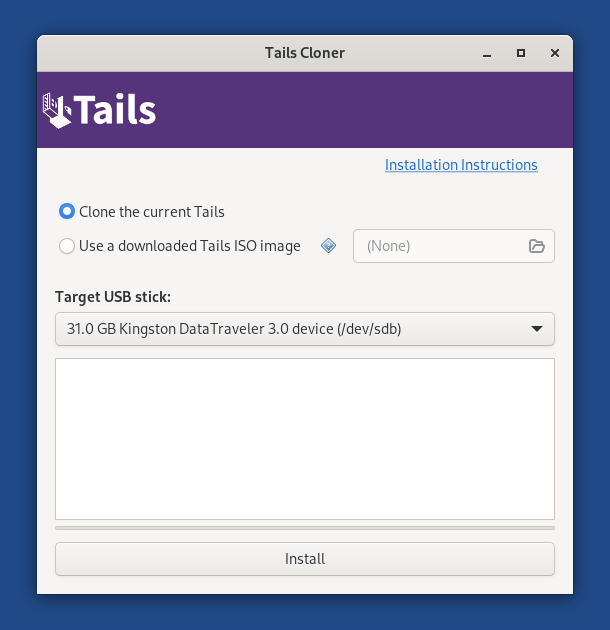
Install Tails by cloning
Upgrade your primary Tails by cloning
In this step, you will upgrade your primary Tails from the other intermediary Tails using Tails Cloner.
Plug the new your intermediary Tails USB stick in addition to the intermediary Tails into the computer.
Todos os dados neste pendrive USB serão perdidos.
Selecione para iniciar o Clonador Tails.
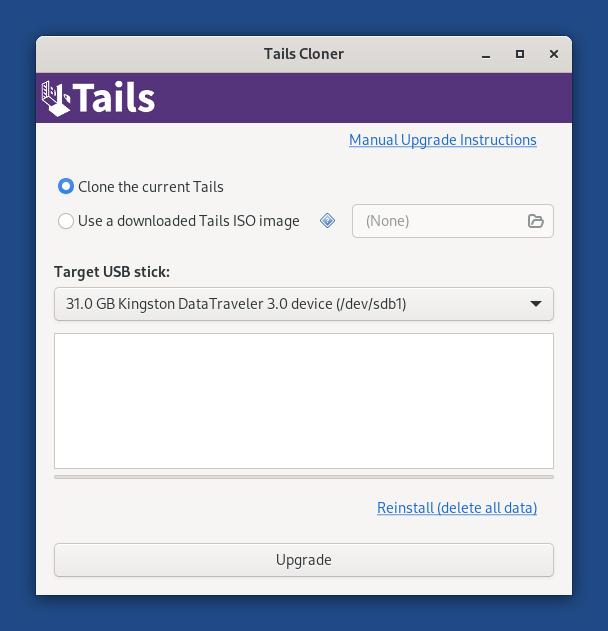
If the Tails that you are cloning from has a Persistent Storage, another option Clone the current Persistent Storage is available.

If you select the option Clone the current Persistent Storage, the Persistent Storage of the Tails USB stick that you are cloning from will also be copied.
If you select the option Clone the current Persistent Storage, the Upgrade button becomes unavailable and you can only reinstall and delete all data on the target USB stick.
In the future, we want to allow cloning the Persistent Storage when upgrading as well, for example to make it quicker to update a backup Tails USB stick. (#20362)
Selecione o novo seu pendrive USB no menu Pendrive USB a ser utilizado.
Para iniciar a instalação, clique no botão Instalar. atualização, clique no botão Atualizar.
Leia a mensagem de advertência na janela de confirmação.
Clique em Apagar Todos os Dados e Instalar para confirmar.
A instalação atualização demora alguns minutos.
A bara de progresso costuma congelar por algum tempo enquanto os dados são sincronizados.
After the installation upgrade finishes, close Tails Cloner
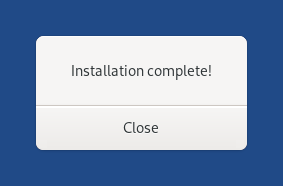
You made it!
You are done upgrading Tails. You can now restart on your Tails USB stick.
Congratulations on staying safe :)
Read the release notes of Tails 6.6 to see what's new.