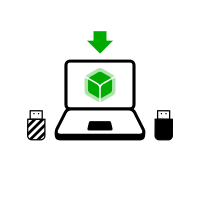
- upgrade
- Aggiornare manualmente da macOS
Ti servono
1 chiavetta USB
Solo per Tails!
da almeno 8 GB
Il tuo Tails
1 chiavetta USB
Tutti i dati andranno persi!
da almeno 8 GB
Windows 7
o successivi
macOS 10.10
Yosemite
o successivi
Linux
qualsiasi distribuzione
Debian
Ubuntu
o altra derivata
Un altro Tails
chiavetta USB o su un DVD
Processore Intel
non Apple M1 or M2
Smartphone
o stampante
per seguire le istruzioni
1 ora in tutto
½ mezz'ora
¼ un quarto d’ora
1.4 GB per scaricare
½ mezz'ora per installare
½ mezz'ora per aggiornare
Requisiti di sistema dettagliati e hardware consigliato.
Sommario
Tails funziona su:
- Sulla maggior parte dei PC che abbiano meno di 10 anni
- Su alcuni vecchi computer Mac con processore Intel
Tails non funziona su:
- Sui computer Mac più recenti con processore Apple (M1 o M2)
- Smartphone o tablet
- Raspberry Pi
Tails potrebbe non funzionare su:
Alcuni computer più vecchi, ad esempio, se non hanno 2 GB di RAM.
Alcuni computer più recenti, ad esempio, se la scheda grafica non è compatibile con Linux. Le schede Nvidia or AMD Radeon spesso non funzionano in Tails.
Vedi il nostro elenco di problemi noti di compatibilità hardware.
Requisiti hardware dettagliati
Una chiavetta USB da almeno 8 GB o un DVD riscrivibile.
Tutti i dati contenuti nella chiavetta USB o nel DVD vengono persi durante l'installazione di Tails.
La capacità di avviare da chiavetta USB o da lettore DVD.
A 64-bit x86-64 IBM PC compatible processor.
2 GB di RAM per lavorare comodamente.
Tails può funzionare con meno di 2 GB di RAM, ma potrebbe presentare anomalie o andare in crash.
Hardware consigliato
I modelli di computer portatili si evolvono troppo rapidamente per poter fornire un elenco aggiornato dell'hardware consigliato. Di seguito sono riportate alcune linee guida se tu, o la tua organizzazione, state pensando di acquistare un computer portatile dedicato all'esecuzione di Tails.
Per PC
Evitare i modelli "gaming" con schede grafiche Nvidia o AMD Radeon.
Considera l'acquisto di un computer portatile ricondizionato di una serie di fascia alta (professionale). Sono più economici e durano più a lungo dei portatili nuovi ma di qualità inferiore.
Ad esempio, la serie ThinkPad di Lenovo funziona bene con Tails, compresi i modelli X250, X1 Carbon, T440, T480 e T490.
Se vivi in una parte del mondo in cui l'acquisto di computer portatili ricondizionati è poco comune, cerca su eBay e Amazon. Amazon offre una garanzia di 90 giorni [Amazon Renewed Guarantee] (https://www.amazon.com/gp/help/customer/display.html?nodeId=G4ZAA22U35N373NX).
Considera l'acquisto di un nuovo portatile da fornitori che garantiscono la compatibilità con Linux e Tails come ThinkPenguin.
Per Mac
Purtroppo non conosciamo alcun modello di Mac che funzioni bene con Tails e che possa eseguire l'ultima versione di macOS.
I passaggi che seguirai
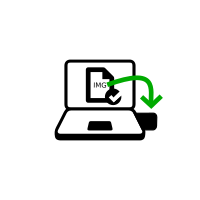
Scarica Tails
Scarica Tails
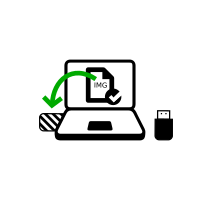
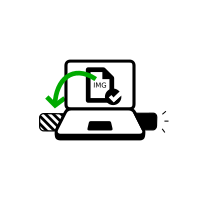
Scarica l'aggiornamento
Verifica il download

Verifica il download

Verifica il download

Riavvia con l'altro Tails

Scarica balenaEtcher
Installa balenaEtcher
Scarica balenaEtcher
Installa balenaEtcher
Installa Tails usando balenaEtcher
Installa Tails usando GNOME Disks
Installa Tails usando dd
Installazione intermedia usando balenaEtcher
[
Installazione intermedia usando GNOME Disks
Installazione intermedia usando GNOME Disks
Riavvia Tails sulla tua chiavetta USB
Riavvia dall'intermedio
Riavvia dall'intermedio
Installa Tails per clonazione
Aggiorna Tails per clonazione
Riavvia sul tuo nuovo Tails

Tails ti accoglie!
Scarica Tails
oppure scarica usando BitTorrent BitTorrent.
Salva il download nella cartella Downloads abituale e non nella chiavetta USB.
Consigliamo di salvare il download nella Archivio Persistente. Altrimenti, Tails potrebbe smettere di rispondere se la memoria RAM del computer si riempie.
Mentr stai scaricando, ti raccomandiamo di leggere le note di rilascio di Tails 6.5 . Le note documentano tutte le modifiche apportate a questa nuova versione: nuove funzionalità, problemi che sono stati risolti, e problemi noti che sono già stati individuati.
Verifica il download
Verifica il download per assicurarti che sia sicuro e che non sia stato danneggiato durante il download.
Il client BitTorrent verificherà il download al termine automaticamente .
La verifica che segue è facoltativa per un download BitTorrent.
Sembra che JavaScript sia disabilitato. Per verificare il download, è possibile:
Abilita JavaScript e ricarica la pagina.
Confronta manualmente il checksum del tuo download con il checksum delle nostre immagini. In Tails puoi installare GtkHash come Software Aggiunto
Verifica l'immagine scaricata usando OpenPGP signing key e la firma OpenPGP . Firma OpenPGP.
Non forniamo più istruzioni per verificare i download con OpenPGP.
Vedi la nostra analisi di sicurezza delle diverse tecniche di verifica.
Sembra che tu stia utilizzando Internet Explorer. Per verificare il download, utilizza un altro browser.
o verifica usando il OpenPGP signature
Verifica di $FILENAME…
![]() Verifica
riuscita! ($FILENAME)
Verifica
riuscita! ($FILENAME)
![]() Verifica fallita!
($FILENAME)
Verifica fallita!
($FILENAME)
È molto probabile che la verifica sia fallita a causa di un errore o di un'interruzione durante lo scaricamento.
La verifica fallisce anche se cerchi di verificare un download diverso dall'ultima versione, Tails 6.5 .
Meno probabilmente, la verifica potrebbe essere fallita a causa di uno scaricamento malevolo dai nostri mirror di scaricamento o a causa di un attacco di rete nel tuo paese o sulla tua rete locale.
Provare a scaricare nuovamente di solito risolve il problema. In altro caso, prova a scaricare da un luogo diverso o da un altro computer.
![]() Errore nella
selezione dell'immagine.
Errore nella
selezione dell'immagine.
Assicurati di selezionare un'immagine USB leggibile dal tuo browser.
Assicurati di selezionare un'immagine ISO leggibile dal tuo browser.
![]() Errore scaricando checksum file dal nostro sito web.
Errore scaricando checksum file dal nostro sito web.
Assicurati che il browser sia connesso a Internet.
![]() Errore di lettura
dell'immagine $FILENAME.
Errore di lettura
dell'immagine $FILENAME.
Assicurati che $FILENAME sia leggibile dal tuo browser.
InstallabalenaEtcher
Nel passaggio successivo, installerai un Tails intermedio utilizzando l'immagine USB di Tails che hai scaricato in precedenza.
balenaEtcher is the Free Software tool that we recommend to install Tails on USB sticks.
Invece di usare balenaEtcher, puoi
anche installare Tails usando dd in riga di
comando.
Assicurati che la tua chiavetta USB sia disinserita.
Apri l'utilità Terminale da Applicazioni ▸ Utilità.
Esegui il comando seguente.
diskutil list
Restituisce un elenco dei dispositivi di archiviazione sul sistema. Ad esempio:
/dev/disk0
 #:                     TYPE NAME         SIZE      IDENTIFIER
 0:    GUID_partition_scheme             *500.1 GB  disk0
 1:                      EFI              209.7 MB  disk0s1
 2:                Apple_HFS MacDrive     250.0 GB  disk0s2
 3:                      EFI              134.1 GB  disk0s3
 4:     Microsoft Basic Data BOOTCAMP     115.5 GB  disk0s4
Inserisci la tua chiavetta USB nel computer.
Esegui nuovamente lo stesso comando.
diskutil list
La tua chiavetta USB appare come un nuovo dispositivo nella lista. Controlla che la sua dimensione corrisponda a quella della tua chiavetta USB.
/dev/disk0
 #:                     TYPE NAME         SIZE      IDENTIFIER
 0:    GUID_partition_scheme             *500.1 GB  disk0
 1:                      EFI              209.7 MB  disk0s1
 2:                Apple_HFS MacDrive     250.0 GB  disk0s2
 3:                      EFI              134.1 GB  disk0s3
 4:     Microsoft Basic Data BOOTCAMP     115.5 GB  disk0s4

/dev/disk1
 #:                     TYPE NAME         SIZE      IDENTIFIER
 0:   FDisk_partition_scheme             *8.0 GB    disk1
 1:                Apple_HFS Untitled 1   8.0 GB    disk1s1
Prendi nota del nome del dispositivo della chiavetta USB.
In questo esempio, la chiavetta USB ha una dimensione di 8.0 GB e il suo nome di dispositivo è /dev/disk1. Quello della tua chiavetta potrebbe essere differente.
Se non sei sicura del nome del dispositivo, dovresti interrompere la procedura o rischi di sovrascrivere qualsiasi disco fisso del sistema.
Esegui il seguente comando per espellere in modo sicuro la chiavetta USB. Sostituisci dispositivo con il nome di dispositivo trovato al passaggio 6.
diskutil unmountDisk dispositivo
Esegui i seguenti comandi per copiare l'immagine USB che hai scaricato in precedenza sulla chiavetta USB.
Sostituisci:
tails.img con il percorso dell'immagine USB
Se non sei sicura del percorso dell'immagine USB, puoi inserire il percorso corretto facendo il drag and drop dell'icona dell'immagine USB da Finder al Terminal.
dispositivo con il nome di dispositivo trovato al passaggio 6
Puoi provare ad aggiungere
rdavanti adiskper rendere più veloce l'installazione.
dd if=tails.img of=dispositivo bs=16m && sync
Dovresti ottenere qualcosa del genere:
dd if=/Users/me/tails-amd64-3.12.img of=/dev/rdisk9 bs=16m && sync
Se non viene restituito alcun messaggio di errore, Tails viene copiato sulla chiavetta USB. La copia richiede un po' di tempo, generalmente qualche minuto.
Se ricevi un errore
Permesso negato, prova ad aggiungeresudoall'inizio del comando:sudo dd if=tails.img of=dispositivo bs=16m && sync
Se si presenta un errore
numero non valido ‘16m’, prova a usare16Min alternativa:dd if=tails.img of=dispositivo bs=16M && sync
L'installazione è completa quando ricompare il prompt dei comandi.
Clicca sul seguente tasto per scaricare balenaEtcher:
Salva il download nella cartella Downloads abituale e non nella chiavetta USB.
Apri il file balenaEtcher scarica (DMG disk image).
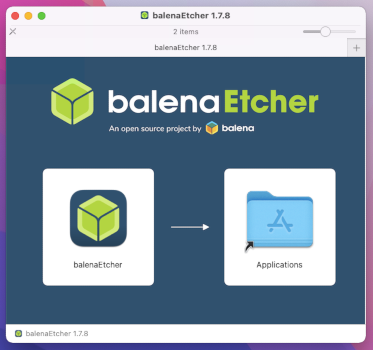
Per installare balenaEtcher, trascina l'icona balenaEtcher sull'icona Applicazioni.
Chiudi la finestra d'installazione di balenaEtcher.
In alternativa, espellI l'immagine del disco di balenaEtcher dalla barra laterale di Finder.
Installa un Tails intermediario usando balenaEtcher
Apri Finder e seleziona balenaEtcher in Applicazioni.
Apri il file balenaEtcher scaricato.
All'avviso di sicurezza, conferma che vuoi aprire balenaEtcher.
balenaEtcher si avvia.
SebalenaEtcher non parte, riavvia Windows e riprova.

Inserisci la chiavetta USB sulla quale vuoi installare Tails. Tails intermedio.
L'Archivio Persistente della tua chiavetta USB con Tails non sarà copiato nella memoria temporanea di Tails.
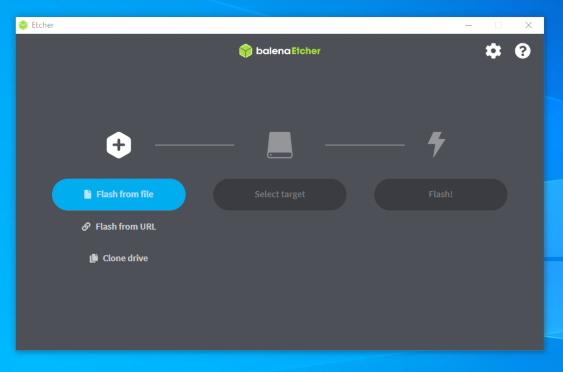
Clicca su Flash da file .
Seleziona l'immagine USB che hai scaricato in precedenza.
Assicurati che l'immagine USB si chiami tails-amd64-6.5.img e che abbia .img come stensione del file
Se l'immagine ha un file .iso come estensione, è l'immagine sbagliata. Torna alla fase del download. fase del download. fase del download. fase del download.
Clicca su Seleziona target per selezionare la tua chiavetta USB.
Tutti i dati su questa chiavetta USB andranno persi.
Fai clic su Flash.
Inserisci la tua password se ti viene chiesto di farlo.
L'installazione richiede alcuni minuti.
Dopo aver installato Tails, balenaEtcher verifica l'installazione.
Se la verifica di balenaEtcher fallisce, prova a installare di nuovo o prova usando un'altra chiavetta USB.
Chiudi balenaEtcher.
Se appare una notifica che comunica che la chiavetta USB non è leggibile, fai clic su Espelli per espellere la chiavetta USB.
Ben fatto!
Complimenti, hai installato Tails sulla tua chiavetta USB!
Riavvia il computer sulla prima chiave USB.
Tails potrebbe non funzionare sul tuo computer, quindi buona fortuna!
Se hai già iniziato con l'altro Tails, passa direttamente al punto 3:Verifica che l'altro Tails sia aggiornato.
Apri queste istruzioni su un altro dispositivo
Nella fase successiva, spegnerai il computer. Per poter seguire il resto delle istruzioni in seguito, puoi scegliere tra:
Scansiona questo codice QR sul tuo smartphone o tablet:
tails net install win dows back 1.png


 tails net install mac clone back 1.png


Stampa le istruzioni su carta.
Prendi nota dell'URL di questa pagina:
https://tails.net/install/windows?back=1
https://tails.net/install/mac?back=1
https://tails.net/install/linux?back=1
https://tails.net/install/expert?back=1
https://tails.net/install/clone/pc?back=1
https://tails.net/install/clone/mac?back=1
https://tails.net/upgrade/tails?back=1
https://tails.net/upgrade/windows?back=1
https://tails.net/upgrade/mac?back=1
https://tails.net/upgrade/linux?back=1
https://tails.net/upgrade/clone?back=1
Riavvia sulla Tails intermediaria
Riavvia su un altra Tails
Riavvia sulla tua chiavetta USB Tails
Riavvia il computer dalla chiave USB.
-
Assicurati di aver installato Tails usando o:
Clicca il tasto Avvia
 .
.Tieni premuto il tasto Shift mentre selezioni Power ▸ Riavvia.
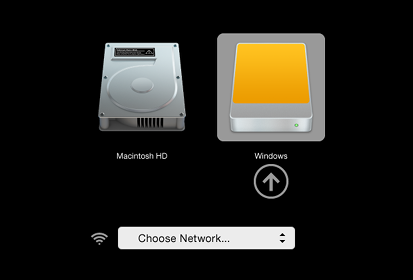
Nella schermata Scegli un'opzione, seleziona Utilizza un dispositivo.
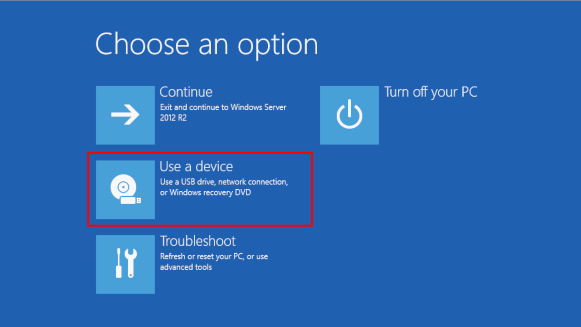
Se la schermata Scegli un'opzione o l'opzione utilizza un dispositivo non appare, fai riferimento alle istruzioni per avviare Tails utilizzando il tasto del Menù di Avvio.
Nella schermata Usa un dispositivo, scegli Menu di avvio.
Windows si spegne, il computer si riavvia e appare un menu di avvio.
Inserisci la tua chiavetta USB Tails poco dopo aver scelto il Menù di avvio e mentre Windows si sta spegnendo.
If your Windows has no Boot Menu option available, make sure that your Tails USB stick is plugged in and choose your USB stick directly in the list of devices.
In futuro, noi noi raccomandiamo di inserire la tua chiavetta USB Tails solo mentre Windows è spento. Altrimenti, un virus in Windows potrebbe infettare la tua chiavetta USB Tails e rompere la sua sicurezza.
Un attacco di questo tipo è possibile in teoria, ma molto improbabile in pratica. Non conosciamo alcun virus in grado di infettare Tails. Vedi le nostre avvertenze sull'utilizzo di Tails in sistemi non affidabili
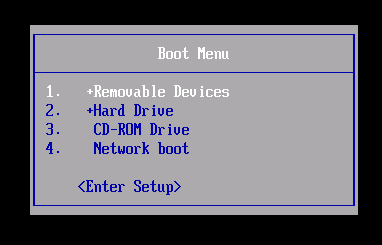
Il Boot Menu è una lista di possibili dispositivi da cui partire. La seguente schermata è un esempio di un menu di avvio:
Nel menu di avvio, seleziona la tua chiavetta USB e premi Invio.
Se il computer si avvia con Tails, appare il Boot Loader e Tails si avvia automaticamente dopo 4 secondi.
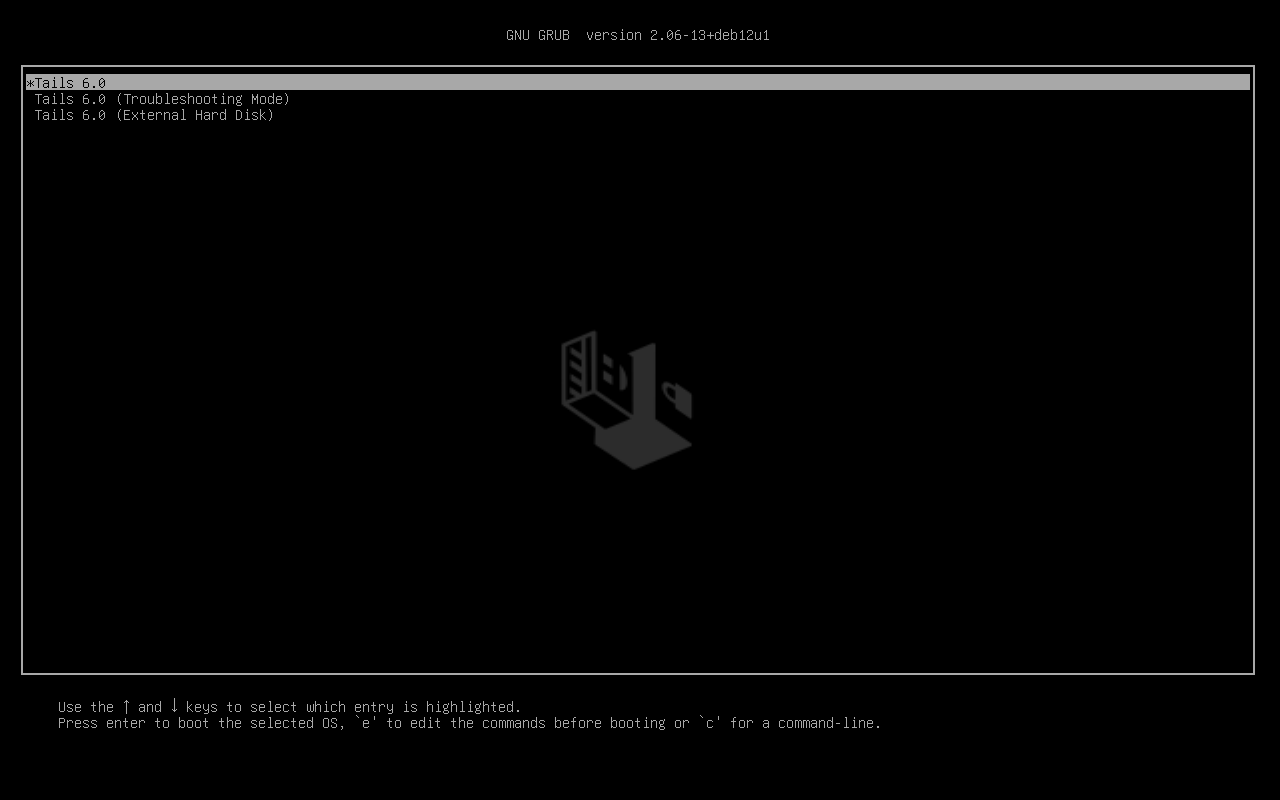
La voce Troubleshooting Mode disabilita alcune funzionalità del kernel Linux e potrebbe funzionare meglio su alcuni computer. Puoi provare questa opzione se ritieni che si verifichino errori di compatibilità hardware durante l'avvio di Tails.
La voce Disco Rigido Esterno permette di avviare da un disco rigido esterno e alcune chiavette USB problematiche.
La maggior parte dei computer non si avvia automaticamente dalla chiavetta USB Tails, ma puoi premere un tasto del Boot Menu per visualizzare una lista di possibili dispositivi da cui partire.
Se Windows 8 o 10 è anche installato sul computer, puoi invece fare riferimento alle istruzioni su come avviare Tails da Windows 8 o 10. Avviare Tails da Windows è più semplice che usare il tasto Boot Menu.
La seguente schermata è un esempio di un menu di avvio:
Questa animazione riassume come usare il tasto Boot Menu per avviare la chiavetta USB:
Le seguenti istruzioni spiegano in dettaglio come usare il tasto Boot Menu per avviare la chiavetta USB:
-
Assicurati di aver installato Tails usando o:
-
Spegni il computer lasciando inserita la chiavetta USB.
Spegni il computer e inserisci la chiavetta USB di Tails.
Spegni il computer.
Inserisci l'altra chiavetta USB Tails da cui vuoi eseguire installazione aggiornamento.
Disinserisci la tua chiavetta USB Tails lasciando inserita la chiavetta USB intermedia.
-
Identifica nella seguente lista i possibili tasti del menu di avvio del computer a seconda del produttore del computer :
Produttore Tasto Acer F12, F9, F2, Esc Apple Opzione Asus Esc Clevo F7 Dell F12 Fujitsu F12, Esc HP F9 Huawei F12 Intel F10 Lenovo F12, Novo MSI F11 Samsung Esc, F12, F2 Sony F11, Esc, F10 Toshiba F12 Others… F12, Esc Su molti computer, all'accensione viene visualizzato molto brevemente un messaggio che spiega anche come aprire il menu di avvio o modificare le impostazioni del BIOS.
-
Riaccendi il computer.
Premi immediatamente più volte il tasto del Boot Menu che hai identificato nel passo 2 .
-
Se il computer si avvia su un altro sistema operativo o restituisce un messaggio di errore, spegni nuovamente il computer e ripeti il passo 3 con tutti i possibili tasti del Boot Menu identificati nel passo 2.
Se appare un menu di avvio con una lista di dispositivi, seleziona la tua chiavetta USB e premi Invio.
Se il computer si avvia con Tails, appare il Boot Loader e Tails si avvia automaticamente dopo 4 secondi.
-
Assicurati di aver installato Tails usando o:
-
Spegni il computer.
Spegni il computer lasciando inserita la chiavetta USB.
Inserisci l'altra chiavetta USB Tails dalla quale vuoi eseguire l'installazione.
-
Inserisci la tua chiavetta USB con Tails.
-
Riaccendi il computer.
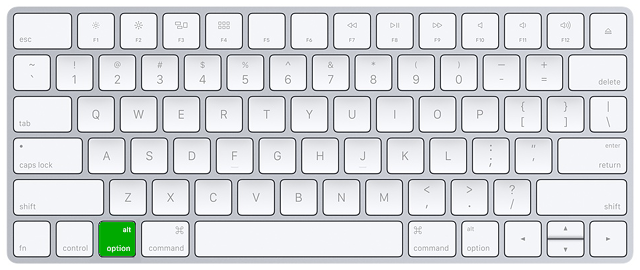
Accendi il computer e immediatamente premi e mantieni premuto il tastoOption key (⌥ o tasto Alt ) quando viene riprodotto il suono di avvio.
Tieni premuto il tasto finché non appare un elenco di possibili dischi di avvio.
-
Seleziona la chiavetta USB e premi Invio. La chiavetta USB appare come un disco rigido esterno e può avere l'etichetta EFI Boot o Windows come nella seguente immagine da schermo:
Se la chiavetta USB non compare nell'elenco dei dischi di avvio:
Wait 2–3 minutes and try again. Some USB sticks need some rest after installing.
Try all other USB ports on the computer. Some USB ports cannot be used to start from.
Make sure that you have installed Tails using either:
Make sure that you have verified your download of Tails.
Make sure that you have verified your download.
-
Try to install again on the same USB stick.
Try to install again on the same USB stick.
Try to install again on the same USB stick.
Try to install again on the same USB stick.
Try to install again on the same USB stick.
Try to install again on the same USB stick.
Try to install again on the same USB stick.
Try to install again on the same USB stick.
Try to install again on the same USB stick.
Try to install again on the same USB stick.
Try to install again on the same USB stick.
Try to install again on the same USB stick.
Try to install on a different USB stick.
Try to use the same USB stick to start on a different computer.
Se il computer non visualizza ancora il Boot Loader, potrebbe essere impossibile avviare Tails sul tuo computer.
-
Se il tuo Mac visualizza l'errore seguente:
Le impostazioni di sicurezza non consentono a questo Mac di utilizzare un disco di avvio esterno.
Quindi devi modificare le impostazioni dell'Utilità di sicurezza all'avvio del tuo Mac per autorizzare l'avvio di Tails.
Per aprire l'Utilità di sicurezza all'avvio:
Accendi il Mac, quindi tieni premuto Comando(⌘)+R subito dopo aver visto il logo Apple. Il Mac si avvia da Ripristino macOS.
Quando viene visualizzata la finestra Utilità di macOS, scegli Utility ▸ Utilità di sicurezza all'avvio dalla barra del menu.
Quando ti viene richiesto di autenticarti, clicca Inserisci password macOS, quindi scegli un account di amministratore e inserisci la relativa password.
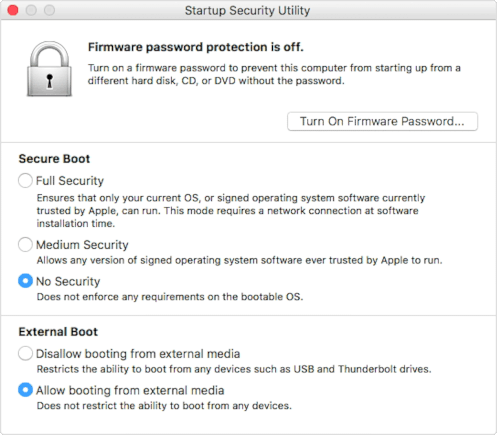
A l' Avvio dell'utilità di sicurezza:
Scegli Nessuna Sicurezza nella sezione Avvio Sicuro.
Scegli Consenti l'avvio da supporti esterni in Avvio Esterno.
Per proteggere ancora il tuo Mac dall'avvio da supporti esterni non affidabili, è possibile impostare una password del firmware, disponibile su macOS Mountain Lion o versioni successive. La password del firmware impedisce agli utenti che non ne sono in possesso di avviare il Mac da un supporto diverso dal disco di avvio designato.
Se dimentichi la password del firmware, è necessario un appuntamento di persona con un Apple Store o un fornitore di servizi autorizzato Apple.
Ulteriori informazioni su Supporto Apple:
Se il computer si avvia con Tails, appare il Boot Loader e Tails si avvia automaticamente dopo 4 secondi.
La voce Troubleshooting Mode disabilita alcune funzionalità del kernel Linux e potrebbe funzionare meglio su alcuni computer. Puoi provare questa opzione se ritieni che si verifichino errori di compatibilità hardware durante l'avvio di Tails.
La voce Disco Rigido Esterno permette di avviare da un disco rigido esterno e alcune chiavette USB problematiche.
Risoluzione dei Problemi Tails non si avvia<h2
-
Se non appare il menu di avvio, fai riferimento alle istruzioni per l'avvio di Tails con il tasto del menu di avvio.
-
Se nessuno dei possibili tasti del menu di avvio della procedura usata precedentemente funziona, fai riferimento alle istruzioni per la risoluzione dei problemi di Tails che non si avvia affatto.
-
Se viene visualizzato il menu di avvio ma la chiavetta USB non è elencata nel menu di avvio:
Aspetta 2–3 minuti e riprova. Alcune chiavette USB hanno bisogno di una pausa dopo l'installazione.
Prova tutte le altre porte USB del computer. Alcune porte USB non possono essere utilizzate per l'avvio.
-
Se la chiavetta USB è elencata nel menu di avvio ma il Boot Loader non appare:
Se la tua chiavetta USB è elencata nel menu di avvio ma il Boot Loader non appare:
Wait 2–3 minutes and try again. Some USB sticks need some rest after installing.
Try all other USB ports on the computer. Some USB ports cannot be used to start from.
Assicurati di aver installato Tails usando o:
Make sure that you have verified your download of Tails.
Make sure that you have verified your download.
-
Try to install again on the same USB stick.
Try to install again on the same USB stick.
Try to install again on the same USB stick.
Try to install again on the same USB stick.
Try to install again on the same USB stick.
Try to install again on the same USB stick.
Try to install again on the same USB stick.
Try to install again on the same USB stick.
Try to install again on the same USB stick.
Try to install again on the same USB stick.
Try to install again on the same USB stick.
Try to install again on the same USB stick.
Try to install on a different USB stick.
Try to use the same USB stick to start on a different computer.
Se il tuo computer non visualizza ancora il Boot Loader, potrebbe essere impossibile avviare Tails sul tuo computer.
-
Se appare il Boot Loader ma Tails non si avvia dopo il Boot Loader, fai riferimento a la sezione sulla risoluzione dei problemi relativi al mancato avvio di Tails dopo il Boot Loader.
L'avvio del computer tramite un tasto del menu di avvio può essere più rapido rispetto all'avvio del computer prima con Windows e poi con Tails. Ti consigliamo di imparare come avviare Tails usando il tasto del menu di avvio se usi Tails regolarmente
Per Apple non è prioritario collaborare con i progetti di Software Libero. Sul loro hardware più recente per gli sviluppatori di Software Libero è molto difficile di solito farci funzionare Linux e quindi Tails. L'hardware dei PC tende a essere più aperto e a funzionare meglio con Linux.
Buon inizio con Tails!
Avvio di Tails
Dopo il menu di avvio, viene visualizzata una schermata di caricamento.

Dopo uno o due minuti dall'avvio del Boot Loader e dalla schermata di caricamento, viene visualizzata la schermata di Buon inizio con Tails.
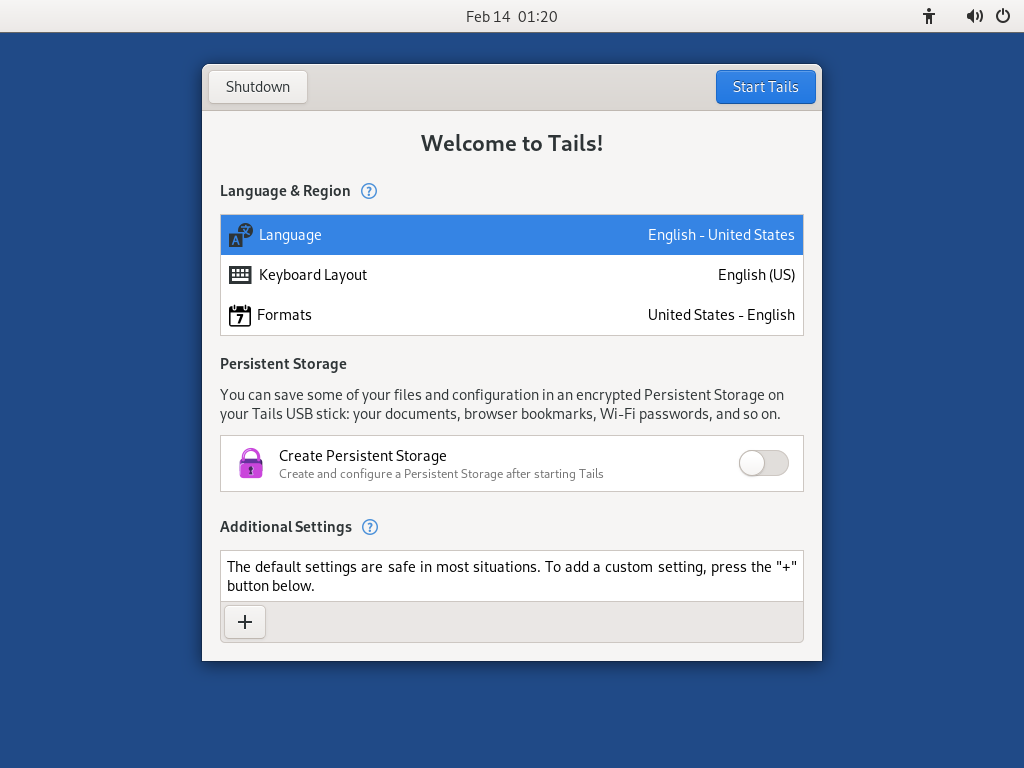
Nella schermata di benvenuto, seleziona la lingua e il layout della tastiera nella sezione Lingua e Formati . Clicca Avvia Tails.
ISe la tastiera o il touchpad non funzionano, prova a utilizzare una tastiera o un mouse USB.
Dopo 15–30 secondi, appare il desktop di Tails.
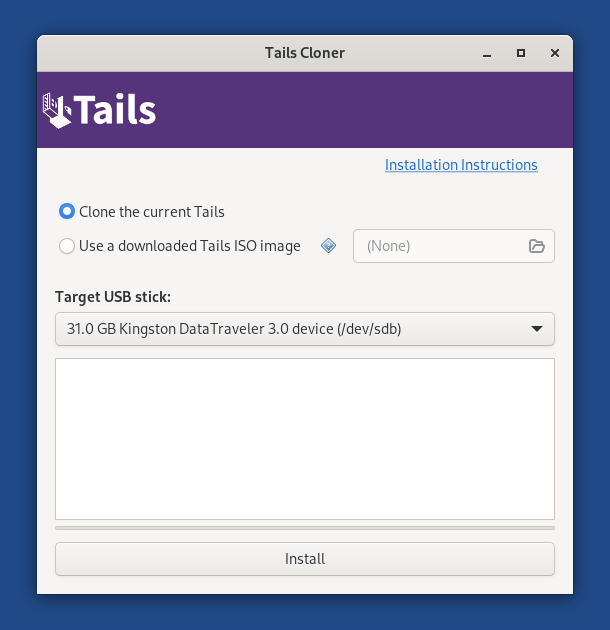
Installa Tails clonando
Aggiorna Tails clonando
In questo passaggio, aggiornerai Tails da altri intermediario Tails usando Tails Cloner.
Inserisci la il nuovo tuoTails chiavetta USB nel computer.
Tutti i dati su questa chiavetta USB verranno persi.
Seleziona per avviare l'Tails Cloner.
 tails
tails If the Tails that you are cloning from has a Persistent Storage, another option Clone the current Persistent Storage is available.

If you select the option Clone the current Persistent Storage, the Persistent Storage of the Tails USB stick that you are cloning from will also be copied.
If you select the option Clone the current Persistent Storage, the Upgrade button becomes unavailable and you can only reinstall and delete all data on the target USB stick.
In the future, we want to allow cloning the Persistent Storage when upgrading as well, for example to make it quicker to update a backup Tails USB stick. (#20362)
Seleziona la nuova tua chiavetta USB nel menù chiavetta USB di destinazione.
Per avviare l'installazione, clicca sul bottone Installa. per l'aggiornamento, clicca sul bottone Aggiorna.
Leggi il messaggio di avviso nella finestra di conferma.
Clicca su Elimina tutti i dati e installa per confermare.
The installation upgrade takes a few minutes.
La barra di avanzamento di solito si blocca per un po' di tempo durante la sincronizzazione dei dati sul disco.
After the installation upgrade finishes, close Tails Cloner
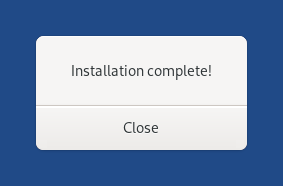
Ce l'hai fatta!
Hai finito l'aggiornamento di Tails. Ora puoi riavviare sulla tua chiavetta USB Tails.
omplimenti per la tua sicurezza :)
Leggi le release notes di Tails 6.5 per vedere cosa c'è di nuovo.