- upgrade
- Manuelles Upgrade von macOS
Sie brauchen
1 USB-Stick
Nur für Tails!
8 GB minimum
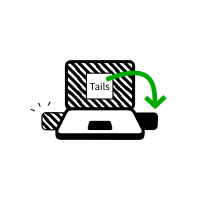
Ihr Tails
1 USB-Stick
All data will be lost!
8 GB minimum
Windows 7
or later
macOS 10.10
Yosemite
or later
Linux
any distribution
Debian
Ubuntu
or another derivative
Another Tails
USB stick or DVD
Intel processor
not Apple M1 or M2
Smartphone
or printer
to follow the instructions
1 hour in total
½ hour
¼ hour
1.4 GB to download
½ hour to install
½ hour to upgrade
Detailed system requirements and recommended hardware.
Summary
Tails works on:
- Most PC computers that are less than 10 years old
- Some older Mac computers with an Intel processor
Tails does not work:
- Newer Mac computers with an Apple processor (M1 or M2)
- Smartphones or tablets
- Raspberry Pi
Tails might not work on:
Some older computers, for example, if they don't have 2 GB of RAM.
Some newer computers, for example, if their graphics card is incompatible with Linux. Nvidia or AMD Radeon cards often do not work in Tails.
See our list of known hardware compatibility issues.
Detailed hardware requirements
A USB stick of 8 GB minimum or a recordable DVD.
All the data on this USB stick or DVD is lost when installing Tails.
The ability to start from a USB stick or a DVD reader.
A 64-bit x86-64 IBM PC compatible processor.
2 GB of RAM to work smoothly.
Tails can work with less than 2 GB RAM but might behave strangely or crash.
Recommended hardware
Laptop models evolve too rapidly for us to be able to provide an up-to-date list of recommended hardware. Below are some guidelines if you, or your organization, are considering acquiring a laptop dedicated to running Tails.
For PC
Avoid "gaming" models with Nvidia or AMD Radeon graphics cards.
Consider buying a refurbished laptop from a high-end (professional) series. These are cheaper and will last longer than new but lower-quality laptops.
For example, the Lenovo ThinkPad series work well with Tails, including the X250, X1 Carbon, T440, T480, and T490 models.
If you live in a part of the world where buying refurbished laptops is uncommon, look on eBay and Amazon. Amazon offers a 90-day Amazon Renewed Guarantee.
Consider buying a new laptop from vendors who guarantee the compatibility with Linux and Tails like ThinkPenguin.
For Mac
Unfortunately, we don't know of any Mac model that works well in Tails and can run the latest macOS version.
Ihre Schritte
Tails downloaden
Tails downloaden
Download the upgrade

Überprüfen Sie Ihren Download

Überprüfen Sie Ihren Download

Überprüfen Sie Ihren Download

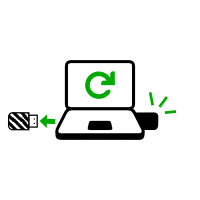
Restart on the other Tails

Download balenaEtcher
Install balenaEtcher
Download balenaEtcher
Install balenaEtcher
Install Tails using balenaEtcher
Install Tails using GNOME Disks
Install Tails using dd
Install intermediary using balenaEtcher
Install intermediary using GNOME Disks
Install intermediary using GNOME Disks

Restart on your Tails USB stick
Restart on intermediary
Restart on intermediary
Install Tails by cloning
Upgrade your Tails by cloning
Restart on your new Tails

Welcome to Tails!
Tails downloaden
or download using BitTorrent BitTorrent
Save your download to your usual Downloads folder and not to the USB stick.
We recommend that you save your download to your Persistent Storage. Otherwise, Tails might stop responding if the RAM memory of the computer gets full.
Während des Downloads empfehlen wir Ihnen, die release notes für Tails zu lesen 6.5 . Sie dokumentieren alle Änderungen in dieser neuen Version: neue Funktionen, Probleme, die gelöst wurden, und bekannte Probleme, die bereits identifiziert wurden.
Überprüfen Sie Ihren Download
Verify your download to make sure that it is safe and was not corrupted during download.
Ihr BitTorrent-Client verifiziert den Download automatisch, sobald er abgeschlossen ist.
The verification below is optional for a BitTorrent download.
You seem to have JavaScript disabled. To verify your download, you can either:
Enable JavaScript and reload this page.
Compare manually the checksum of your download with the checksum of our images. In Tails, you can install GtkHash as Additional Software
Verify your download using our OpenPGP signing key and OpenPGP signature. OpenPGP signature.
We don't provide instructions to verify downloads with OpenPGP anymore.
See our security analysis of the different verification techniques.
You seem to be using Internet Explorer. To verify your download, please use a different browser.
or verify using the OpenPGP signature
OpenPGP signature OpenPGP signature
If you don't know how to use the OpenPGP signature, click instead on the button Select your download… to verify your download with JavaScript.
Verifying $FILENAME…
![]() Verification
successful! ($FILENAME)
Verification
successful! ($FILENAME)
![]() Verification
failed! ($FILENAME)
Verification
failed! ($FILENAME)
Most likely, the verification failed because of an error or interruption during the download.
Die Verifizierung schlägt auch fehl, wenn Sie versuchen, eine andere als die neueste Version von Tails zu verifizieren, 6.5 .
Less likely, the verification might have failed because of a malicious download from our download mirrors or due to a network attack in your country or local network.
Downloading again is usually enough to fix this problem. Otherwise, please try downloading from a different place or a different computer.
![]() Error selecting
image.
Error selecting
image.
Make sure that you select a USB image that is readable by your browser.
Make sure that you select an ISO image that is readable by your browser.
![]() Error downloading checksum file from our website.
Error downloading checksum file from our website.
Make sure that your browser is connected to the Internet.
Installiere balenaEtcher
In den folgenden Schritten installieren Sie ein Tails-Zwischenprodukt unter Verwendung des Tails-USB-Images, das Sie zuvor heruntergeladen haben.
balenaEtcher is the Free Software tool that we recommend to install Tails on USB sticks.
Instead of using balenaEtcher, you can
also install Tails using dd on the command
line.
Make sure that your USB stick is unplugged.
Open the Terminal utility from Applications ▸ Utilities.
Execute the following command.
diskutil list
Es wird eine Liste der Speichermedien des Systems ausgegeben. Zum Beispiel:
/dev/disk0
 #:                     TYPE NAME         SIZE      IDENTIFIER
 0:    GUID_partition_scheme             *500.1 GB  disk0
 1:                      EFI              209.7 MB  disk0s1
 2:                Apple_HFS MacDrive     250.0 GB  disk0s2
 3:                      EFI              134.1 GB  disk0s3
 4:     Microsoft Basic Data BOOTCAMP     115.5 GB  disk0s4
Plug your USB stick into the computer.
Execute again the same command.
diskutil list
Ihr USB-Stick erscheint als neues Speichermedium in der Liste. Stellen Sie sicher, dass die Größe der Speicherkapazität Ihres USB-Sticks entspricht.
/dev/disk0
 #:                     TYPE NAME         SIZE      IDENTIFIER
 0:    GUID_partition_scheme             *500.1 GB  disk0
 1:                      EFI              209.7 MB  disk0s1
 2:                Apple_HFS MacDrive     250.0 GB  disk0s2
 3:                      EFI              134.1 GB  disk0s3
 4:     Microsoft Basic Data BOOTCAMP     115.5 GB  disk0s4

/dev/disk1
 #:                     TYPE NAME         SIZE      IDENTIFIER
 0:   FDisk_partition_scheme             *8.0 GB    disk1
 1:                Apple_HFS Untitled 1   8.0 GB    disk1s1
Take note of the device name of your USB stick.
In this example, the USB stick is 8.0 GB and its device name is /dev/disk1. Yours might be different.
Falls Sie sich bezüglich des Gerätenamens nicht sicher sind, sollten Sie das Vorgehen abbrechen oder Sie riskieren, dass jegliche Festplatten des Systems überschrieben werden.
Execute the following command to safely eject the USB stick. Replace device with the device name found in step 6.
diskutil unmountDisk device
Führen Sie die folgenden Befehle aus, um das zuvor heruntergeladene USB-Image auf den USB-Stick zu kopieren.
Ersetzen Sie:
tails.img with the path to the USB image
Falls Sie sich über den Pfad zum ISO-Image unsicher sind, können Sie den richtigen Pfad per Drag and Drop des Symbols des ISO-Abbilds vom Finder in das Terminal einfügen.
device mit dem Gerätenamen, den Sie in Schritt 6 herausgefunden haben
Sie können versuchen,
rvordiskeinzugeben, um die Installation zu beschleunigen.
dd if=tails.img of=device bs=16m && sync
Sie sollten etwas wie folgt erhalten:
dd if=/Users/me/tails-amd64-3.12.img of=/dev/rdisk9 bs=16m && sync
Wenn keine Fehlermeldung angezeigt wird, wird Tails auf den USB-Stick kopiert. Das Kopieren benötigt einige Zeit, in der Regel ein paar Minuten.
If you get a
Permission deniederror, try addingsudoat the beginning of the command:sudo dd if=tails.img of=device bs=16m && sync
If you get an
invalid number ‘16m’error, try using16Minstead:dd if=tails.img of=device bs=16M && sync
The installation is complete when the command prompt reappears.
Klicken Sie auf die folgende Schaltfläche, um balenaEtcher herunterzuladen:
Save your download to your usual Downloads folder and not to the USB stick.
Open the balenaEtcher download (DMG disk image).
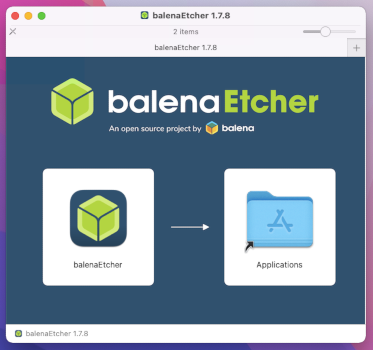
To install balenaEtcher, drag the balenaEtcher icon onto the Applications icon.
Close the installation window of balenaEtcher.
Optionally, eject the disk image of balenaEtcher from the sidebar of Finder.
Install an intermediary Tails using balenaEtcher
Öffne Finder und wähle balenaEtcher unter Anwendungen.
Öffnen Sie den balenaEtcher-Download.
Bestätigen Sie bei der Sicherheitswarnung, dass Sie balenaEtcher öffnen möchten.
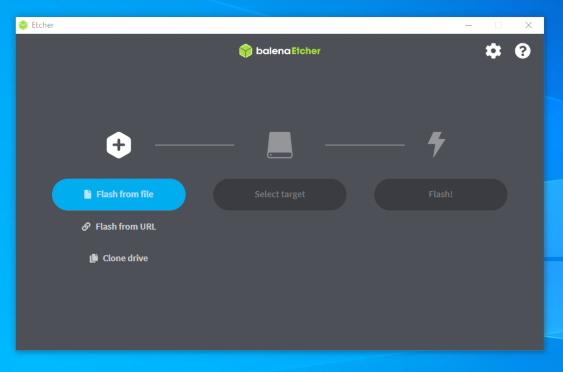
balenaEtcher startet.
If balenaEtcher does not start, restart Windows and try again.

Plug in the USB stick on which you want to install Tails. the intermediary Tails.
Der persistente Speicher Ihres Tails-USB-Sticks wird nicht in das temporären Tails kopiert.
Click the Flash from file button.
Choose the USB image that you downloaded earlier.
Make sure that the USB image is called tails-amd64-6.5.img and has an .img file extension.
If the image has an .iso file extension, it is the wrong image. Please go back to the download step. download step. download step. download step.
Klicken Sie auf die Schaltfläche Ziel auswählen, um Ihren USB-Stick auszuwählen.
Alle Daten auf diesem USB-Stick gehen verloren.
Click Flash.
Enter your password if you are asked for it.
The installation takes a few minutes.
After installing Tails, balenaEtcher verifies the installation.
If the verification of balenaEtcher fails, try to install again or try using a different USB stick.
Close balenaEtcher.
If a notification about the USB stick not being readable appears, click Eject to eject the USB stick.
Gut gemacht!
You have installed Tails on your USB stick.
Im nächsten Schritt werden Sie Ihren Computer so einrichten, dass er von diesem USB-Stick startet.
Tails might not work on your computer, so good luck!
If you already started on the other Tails, go directly to step 3: Verify that the other Tails is up-to-date.
Öffnen Sie diese Anweisungen auf einem anderen Gerät
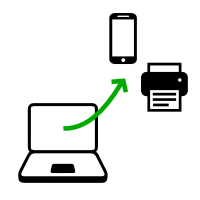
In the next step, you will shut down the computer. To be able to follow the rest of the instructions afterwards, you can either:
Scan this QR code on your smartphone or tablet:


Print these instructions on paper.
Take note of the URL of this page:
https://tails.net/install/windows?back=1
https://tails.net/install/mac?back=1
https://tails.net/install/linux?back=1
https://tails.net/install/expert?back=1
https://tails.net/install/clone/pc?back=1
https://tails.net/install/clone/mac?back=1
https://tails.net/upgrade/tails?back=1
https://tails.net/upgrade/windows?back=1
https://tails.net/upgrade/mac?back=1
https://tails.net/upgrade/linux?back=1
https://tails.net/upgrade/clone?back=1
Neustart auf dem Zwischen-Tails
Neustart auf dem anderen Tails
Neustart auf Ihrem Tails USB-Stick

Den Computer vom USB-Stick starten lassen
-
Vergewissern Sie sich, dass Sie Tails mit einer der folgenden Methoden installiert haben:
Klicken Sie auf die Schaltfläche Start
 .
.Halten Sie die Shift-Taste gedrückt, während Sie Power ▸ Restart wählen.
Wählen Sie im Bildschirm Option auswählen die Option Gerät verwenden.
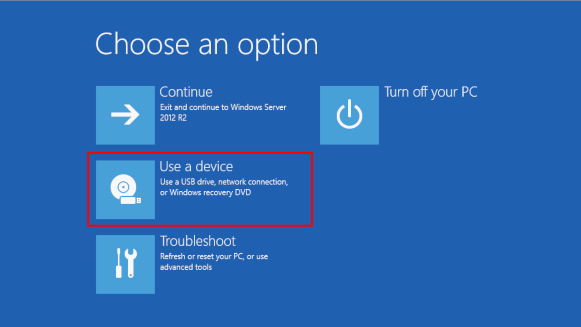
Wenn der Bildschirm Option auswählen oder die Option Gerät verwenden nicht angezeigt wird, lesen Sie die Anleitung zum Starten von Tails mit der Boot-Menütaste.
Wählen Sie im Bildschirm Gerät verwenden die Option Boot-Menü.
Windows wird heruntergefahren, der Computer wird neu gestartet, und es wird ein Boot-Menü angezeigt.
Stecken Sie Ihren Tails-USB-Stick ein, kurz nachdem Sie Boot-Menü gewählt haben und während Windows herunterfährt.
If your Windows has no Boot Menu option available, make sure that your Tails USB stick is plugged in and choose your USB stick directly in the list of devices.
In Zukunft empfehlen wir Wir, dass Sie Ihren Tails USB-Stick nur einstecken, wenn Windows heruntergefahren ist. Andernfalls könnte ein Virus in Windows Ihren Tails-USB-Stick infizieren und dessen Sicherheit beeinträchtigen.
Ein solcher Angriff ist theoretisch möglich, in der Praxis jedoch sehr unwahrscheinlich. Wir kennen keinen Virus, der Tails infizieren könnte. Siehe unsere Warnung zum Einstecken von Tails in nicht vertrauenswürdige Systeme.
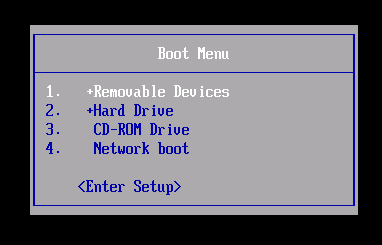
Das Boot-Menü ist eine Liste der möglichen Geräte, von denen aus gestartet werden kann. Der folgende Screenshot ist ein Beispiel für ein Boot-Menü:
Wählen Sie im Boot-Menü Ihren USB-Stick aus und drücken Sie Enter.
Wenn der Computer mit Tails startet, erscheint der Boot Loader und Tails startet automatisch nach 4 Sekunden.
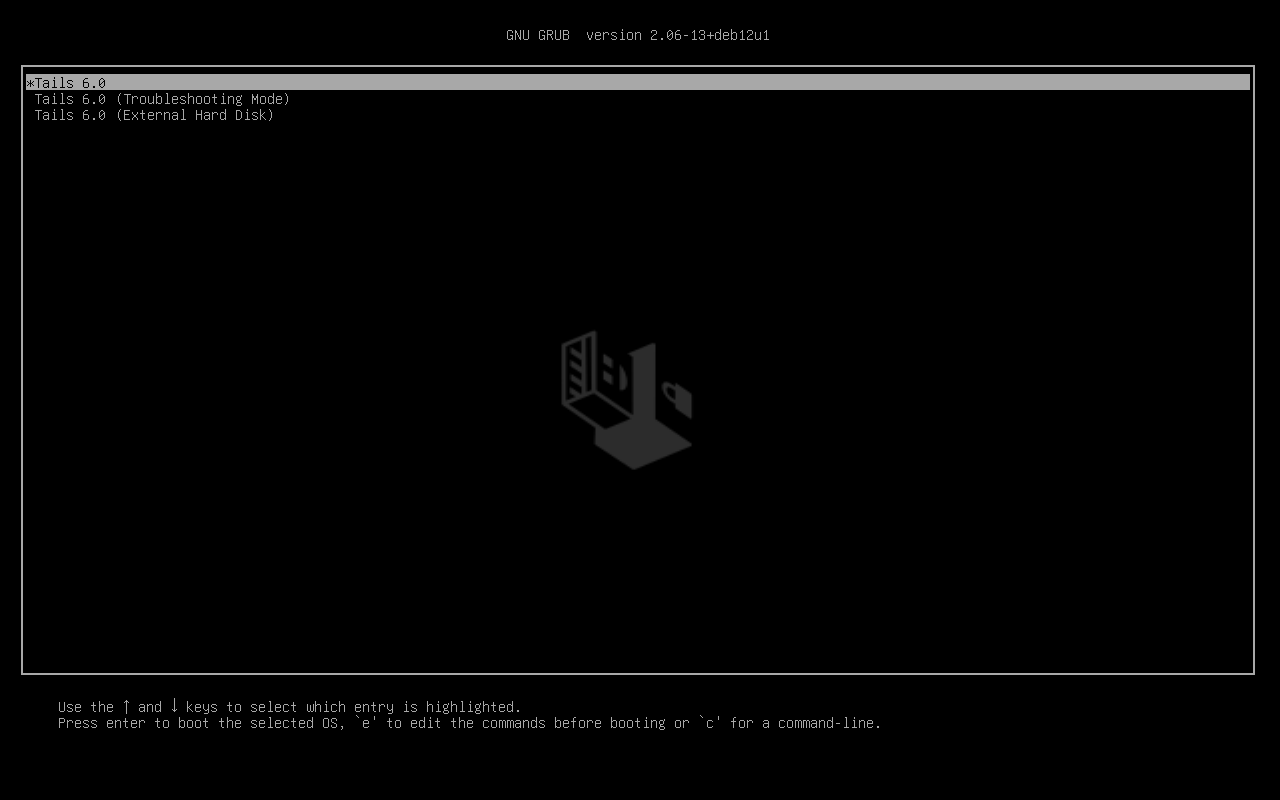
Der Troubleshooting Mode deaktiviert einige Funktionen des Linux-Kernels und könnte auf manchen Computern besser funktionieren. Sie können diese Option ausprobieren, wenn Sie glauben, dass Sie Hardware-Kompatibilitätsfehler beim Starten von Tails haben.
Der Eintrag Externe Festplatte ermöglicht den Start von einer externen Festplatte und einige problematische USB-Sticks.
Die meisten Computer starten nicht automatisch auf dem Tails-USB-Stick, aber Sie können eine Boot-Menü-Taste drücken, um eine Liste der möglichen Geräte anzuzeigen, von denen aus gestartet werden kann.
Wenn Windows 8, 10 oder 11 auch auf dem Computer installiert ist, können Sie stattdessen die Anleitung zum Starten von Tails aus Windows 8 oder 10 verwenden. Tails von Windows aus zu starten ist einfacher als die Verwendung der Boot-Menü-Taste.
Der folgende Screenshot ist ein Beispiel für ein Boot-Menü:
Diese Animation fasst zusammen, wie man mit der Boot-Menü-Taste auf dem USB-Stick startet:
In der folgenden Anleitung wird detailliert erklärt, wie man mit der Taste Boot Menu auf dem USB-Stick startet:
-
Vergewissern Sie sich, dass Sie Tails mit einer der folgenden Methoden installiert haben:
-
Fahre den Compter herunter und lasse dabei den USB Stick eingesteckt.
Shut down the computer and plug in the Tails USB stick.
Schalten Sie den Computer aus.
Plug in the other Tails USB stick that you want to install upgrade from.
Unplug your Tails USB stick while leaving the intermediary USB stick plugged in.
-
Identify the possible Boot Menu keys for the computer depending on the computer manufacturer in the following list:
Manufacturer Key Acer F12, F9, F2, Esc Apple Option Asus Esc Clevo F7 Dell F12 Fujitsu F12, Esc HP F9 Huawei F12 Intel F10 Lenovo F12, Novo MSI F11 Samsung Esc, F12, F2 Sony F11, Esc, F10 Toshiba F12 Others… F12, Esc On many computers, a message is displayed very briefly when switching on that also explains how to get to the Boot Menu or edit the BIOS settings.
-
Schalten Sie den Computer ein.
Immediately press several times the first possible Boot Menu key identified in step 2.
-
If the computer starts on another operating system or returns an error message, shut down the computer again and repeat step 3 for all the possible Boot Menu keys identified in step 2.
If a Boot Menu with a list of devices appears, select your USB stick and press Enter.
Wenn der Computer mit Tails startet, erscheint der Boot Loader und Tails startet automatisch nach 4 Sekunden.
-
Vergewissern Sie sich, dass Sie Tails mit einer der folgenden Methoden installiert haben:
-
Schalten Sie den Computer aus.
Fahre den Compter herunter und lasse dabei den USB Stick eingesteckt.
Plug in the other Tails USB stick that you want to install from.
-
Plug in your Tails USB stick.
-
Schalten Sie den Computer ein.
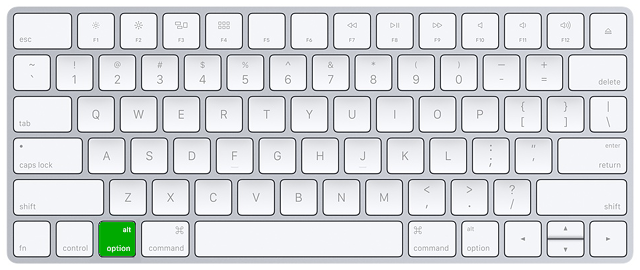
Immediately press-and-hold the Option key (⌥ or Alt key) when the startup sound is played.
Hold the key pressed until a list of possible startup disks appears.
-
Wählen Sie den USB-Stick aus und drücken Sie Enter. Der USB-Stick erscheint als externe Festplatte und könnte als EFI Boot oder Windows beschriftet sein, wie im folgenden Screenshot:
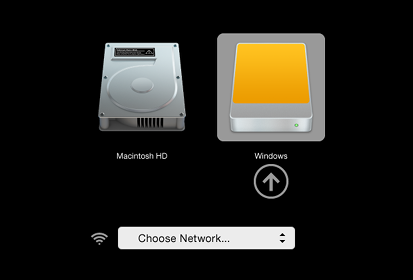
Wenn der USB-Stick nicht in der Liste der Startlaufwerke erscheint:
Wait 2–3 minutes and try again. Some USB sticks need some rest after installing.
Try all other USB ports on the computer. Some USB ports cannot be used to start from.
Make sure that you have installed Tails using either:
Make sure that you have verified your download of Tails.
Make sure that you have verified your download.
-
Try to install again on the same USB stick.
Try to install again on the same USB stick.
Try to install again on the same USB stick.
Try to install again on the same USB stick.
Try to install again on the same USB stick.
Try to install again on the same USB stick.
Try to install again on the same USB stick.
Try to install again on the same USB stick.
Try to install again on the same USB stick.
Try to install again on the same USB stick.
Try to install again on the same USB stick.
Try to install again on the same USB stick.
Try to install on a different USB stick.
Try to use the same USB stick to start on a different computer.
If your computer still does not display the Boot Loader, it might currently be impossible to start Tails on your computer.
-
If your Mac displays the following error:
Security settings do not allow this Mac to use an external startup disk.
Then you have to change the settings of the Startup Security Utility of your Mac to authorize starting from Tails.
To open Startup Security Utility:
Turn on your Mac, then press and hold Command(⌘)+R immediately after you see the Apple logo. Your Mac starts up from macOS Recovery.
When you see the macOS Utilities window, choose Utilities ▸ Startup Security Utility from the menu bar.
When you are asked to authenticate, click Enter macOS Password, then choose an administrator account and enter its password.
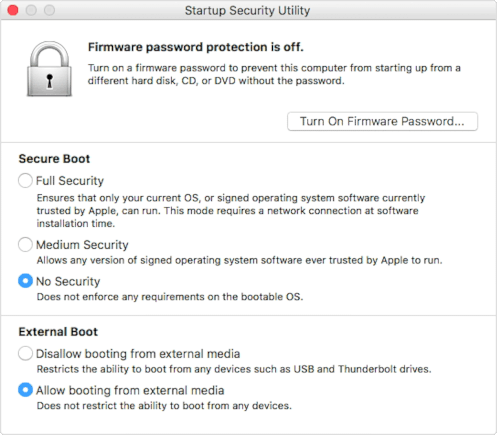
In the Startup Security Utility:
Choose No Security in the Secure Boot section.
Choose Allow booting from external media in the External Boot.
To still protect your Mac from starting on untrusted external media, you can set a firmware password, available on macOS Mountain Lion or later. A firmware password prevents users who do not have the password from starting up from any media other than the designated startup disk.
If you forget your firmware password you will require an in-person service appointment with an Apple Store or Apple Authorized Service Provider.
Read more on Apple Support about:
Wenn der Computer mit Tails startet, erscheint der Boot Loader und Tails startet automatisch nach 4 Sekunden.
Der Troubleshooting Mode deaktiviert einige Funktionen des Linux-Kernels und könnte auf manchen Computern besser funktionieren. Sie können diese Option ausprobieren, wenn Sie glauben, dass Sie Hardware-Kompatibilitätsfehler beim Starten von Tails haben.
Der Eintrag Externe Festplatte ermöglicht den Start von einer externen Festplatte und einige problematische USB-Sticks.
Troubleshoot Tails not starting
-
If no Boot Menu appears, refer to the instructions on starting Tails using the Boot Menu key.
-
If none of the possible Boot Menu keys from the previous technique work, refer to the troubleshooting instructions about Tails not starting at all.
-
If the Boot Menu appears but your USB stick is not listed in the Boot Menu:
Wait 2–3 minutes and try again. Some USB sticks need some rest after installing.
Try all other USB ports on the computer. Some USB ports cannot be used to start from.
-
If your USB stick is listed in the Boot Menu but the Boot Loader does not appear:
If your USB stick appears in the list of startup disks but the Boot Loader does not appear:
Wait 2–3 minutes and try again. Some USB sticks need some rest after installing.
Try all other USB ports on the computer. Some USB ports cannot be used to start from.
Vergewissern Sie sich, dass Sie Tails mit einer der folgenden Methoden installiert haben:
Make sure that you have verified your download of Tails.
Make sure that you have verified your download.
-
Try to install again on the same USB stick.
Try to install again on the same USB stick.
Try to install again on the same USB stick.
Try to install again on the same USB stick.
Try to install again on the same USB stick.
Try to install again on the same USB stick.
Try to install again on the same USB stick.
Try to install again on the same USB stick.
Try to install again on the same USB stick.
Try to install again on the same USB stick.
Try to install again on the same USB stick.
Try to install again on the same USB stick.
Try to install on a different USB stick.
Try to use the same USB stick to start on a different computer.
Wenn Ihr Computer immer noch den Boot-Loader nicht anzeigt, könnte es derzeit unmöglich sein, Tails auf Ihrem Computer zu starten.
-
If the Boot Loader appears but Tails fails to start after the Boot Loader, refer to the troubleshooting section about Tails not starting after the Boot Loader. the troubleshooting section about Tails not starting after the Boot Loader.
Starting the computer using a Boot Menu key can be faster than starting the computer on Windows first and then on Tails. We recommend you learn how to start Tails using the Boot Menu key if you use Tails regularly.
Apple does not prioritize collaborating with Free Software projects. Their newest hardware is usually very hard for Free Software developers to get working with Linux, and thus Tails. PC hardware tends to be more open and work better with Linux.
Willkommen bei Tails!
Starting Tails
After the Boot Menu, a loading screen appears.

One to two minutes after the Boot Loader and the loading screen, the Welcome Screen appears.
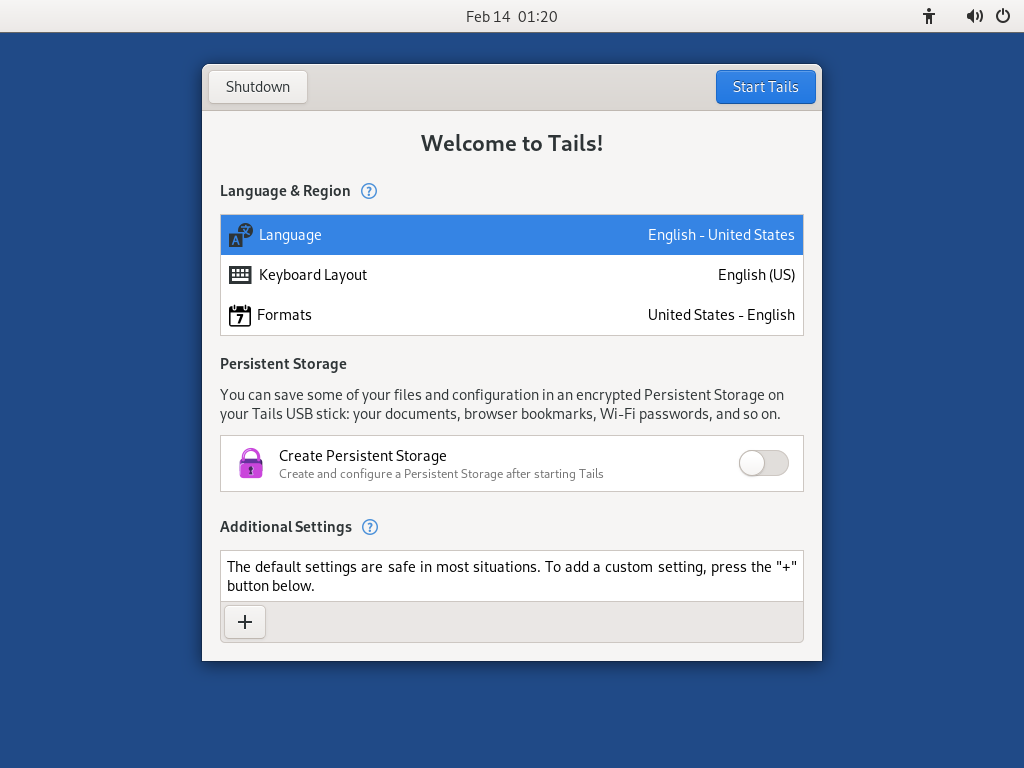
In the Welcome Screen, select your language and keyboard layout in the Language and Formats section. Click Start Tails.
If your keyboard or touchpad doesn't work, try using a USB keyboard or mouse.
Nach 15–30 Sekunden erscheint der Desktop von Tails.
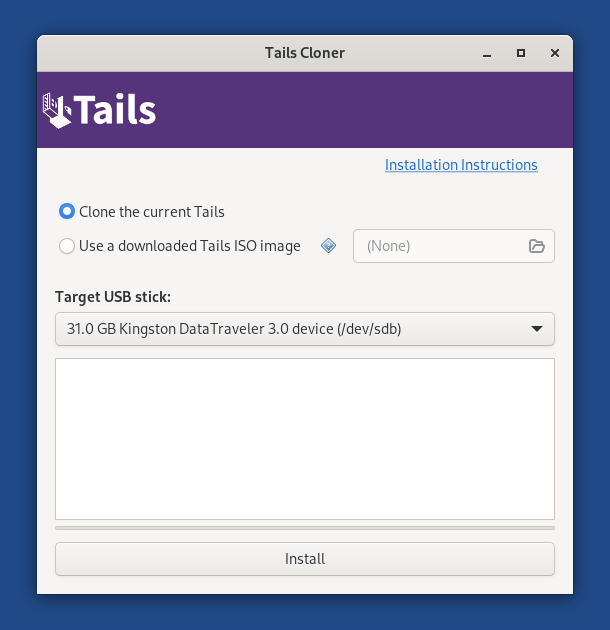
Tails installieren durch Klonen
Tails aktualisieren durch Klonen
In diesem Schritt werden Sie Ihr Tails von dem anderen verrübergehenden Tails unter Verwendung von Tails Cloner aktualisieren.
Stecken Sie den neuen USB-Stick Ihres Tails in den Computer.
Alle Daten auf diesem USB-Stick werden verloren gehen.
Wählen Sie um Tails-Kloner zu starten.
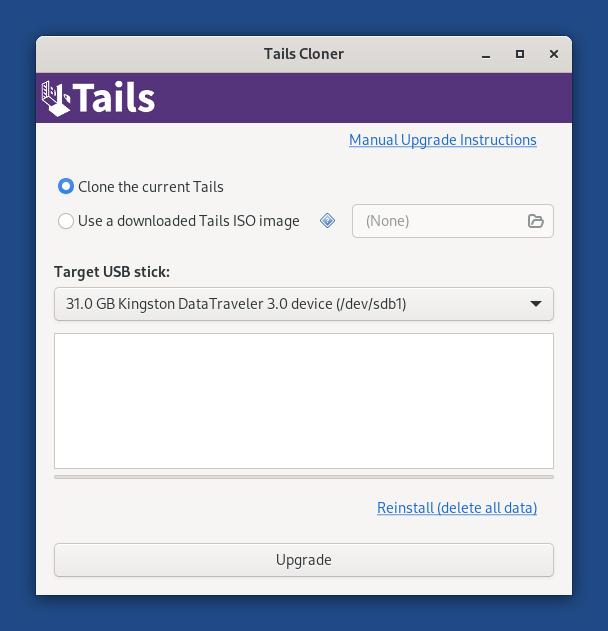
If the Tails that you are cloning from has a Persistent Storage, another option Clone the current Persistent Storage is available.

If you select the option Clone the current Persistent Storage, the Persistent Storage of the Tails USB stick that you are cloning from will also be copied.
If you select the option Clone the current Persistent Storage, the Upgrade button becomes unavailable and you can only reinstall and delete all data on the target USB stick.
In the future, we want to allow cloning the Persistent Storage when upgrading as well, for example to make it quicker to update a backup Tails USB stick. (#20362)
Wählen Sie das neue Ihr USB-Stick im Menü Ziel-USB-Stick aus.
Um die Installation zu starten, klicken Sie auf den Installieren-Button. Aktualisierung, klicken Sie auf den Aktualisieren-Button.
Lesen Sie die Warnmeldung im Bestätigungsfenster.
Click Delete All Data and Install to confirm.
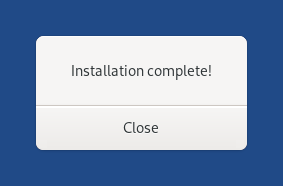
Die Installation Aktualisierung dauert einige Minuten.
The progress bar usually freezes for some time while synchronizing data on disk.
After the installation upgrade finishes, close Tails Cloner
You made it!
You are done upgrading Tails. You can now restart on your Tails USB stick.
Congratulations on staying safe :)
Read the release notes of Tails 6.5 to see what's new.